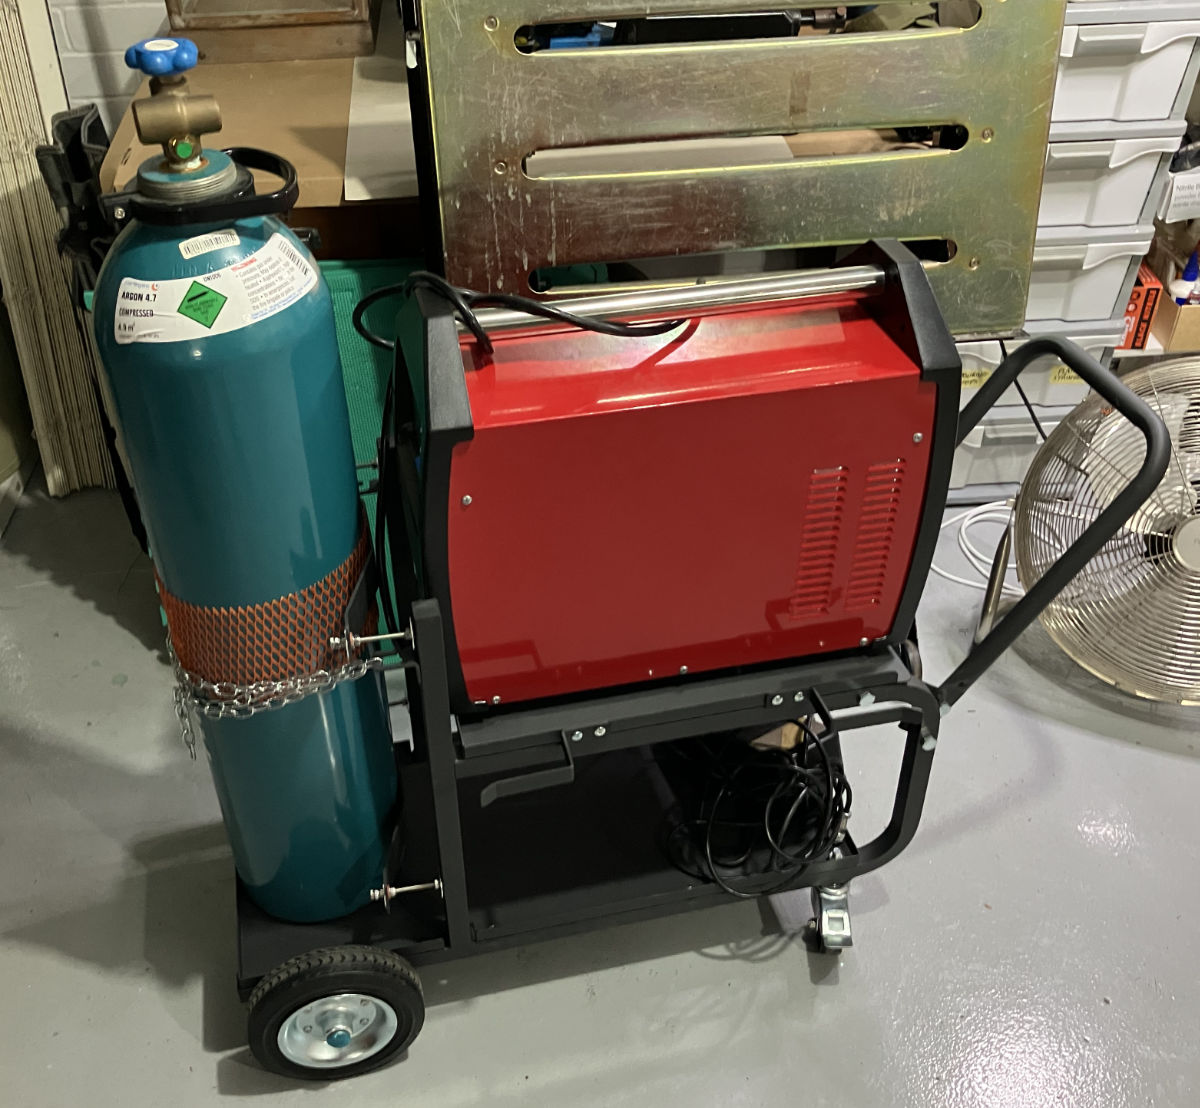
I welcomed a new piece of kit into my metal fabrication setup this week – a Michigan heavy duty welding trolley. This one, specifically.
I have some very specific concerns with my gear, which this trolley had to address. For starters, my welder is very heavy; 20+ KG, as it’s both a welder and a plasma cutter. I bought the combined machine as I was space constrained, and couldn’t fit separate machines for each task. A good idea, but it has this downside – the one machine is heavy, and deep. It’s so deep, that it doesn’t fit on the shelf of most welding trolleys.
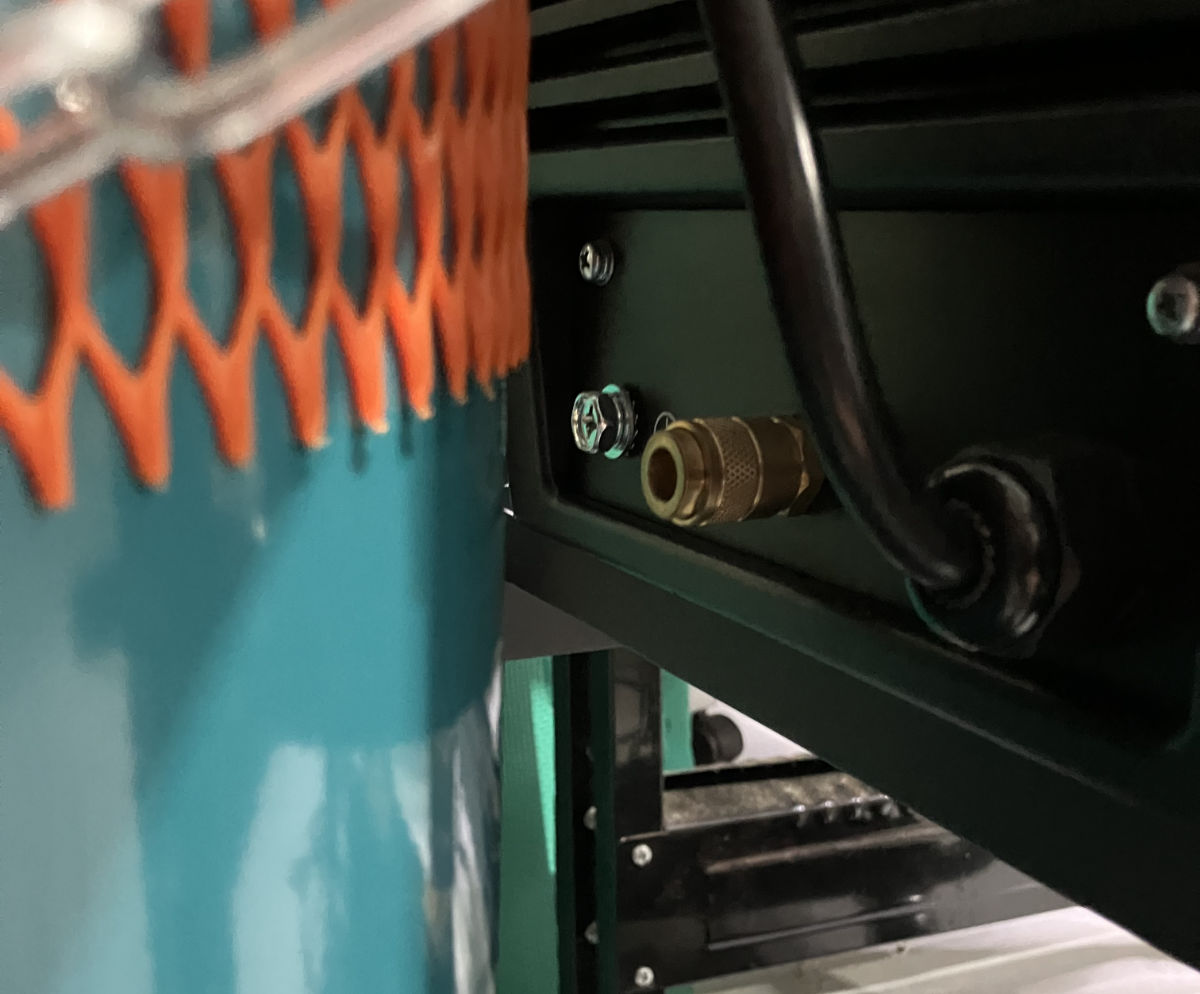
Secondly, the welder’s shield gas input is dead-centre on the machine. This means when it’s pushed as far back as possible, so it fits on the trolley’s shelf, there isn’t room for the gas fitting and hose between the machine, and the gas bottle.
The alternatives are to extend the shelf, or, to push the gas bottle back. I went with the latter, given there’s room for a bigger bottle than mine.
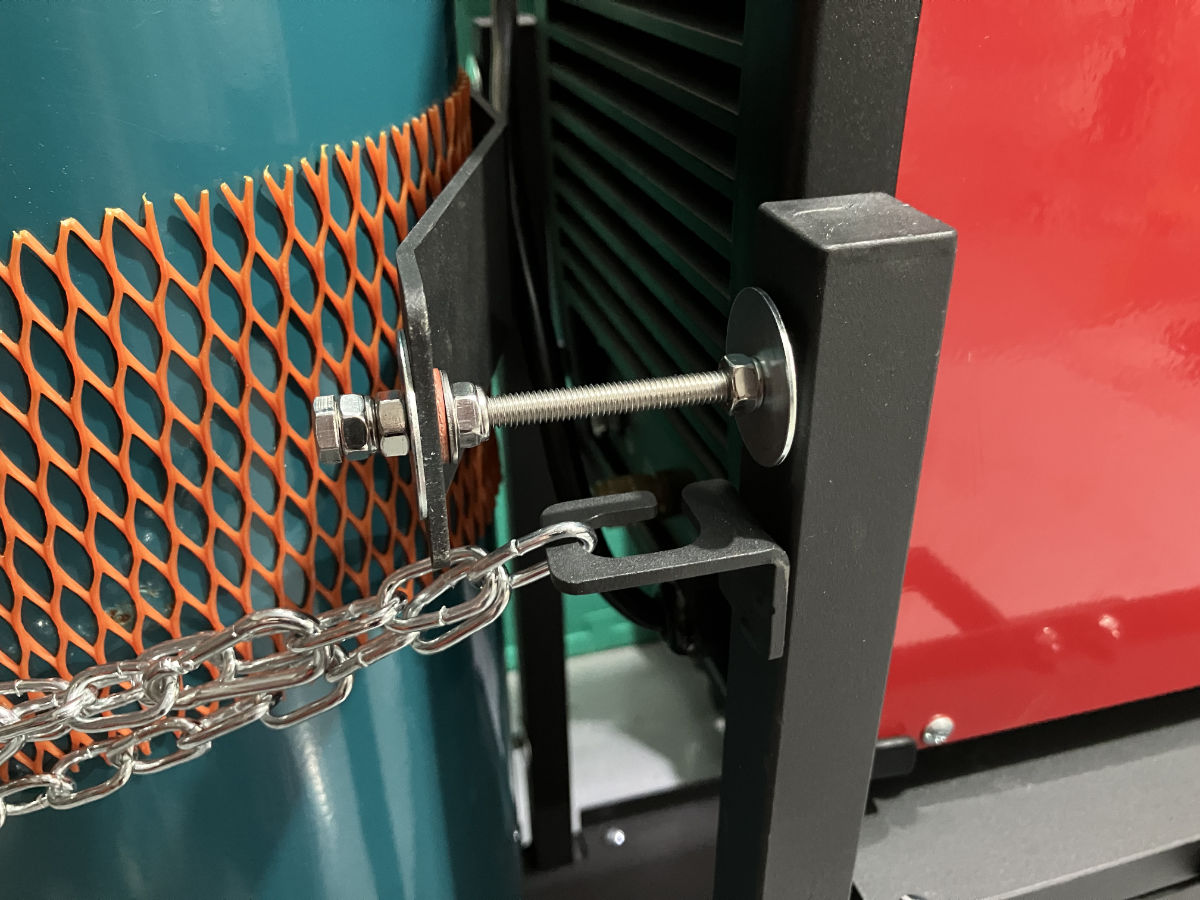
The solution, potentially temporary, depending on how it holds up, was to make standoffs to move the cradle (which secures the bottle) back. Thankfully the cradle parts are bolted on to the frame, so it was just a matter of using longer bolts, with nylock nuts and washers, to cantilever the cradle parts out. The added bonus is the threading means it’s very adjustable to the size of the cylinder.
One of the problems when carrying a DSLR, is that occasionally you might want to go somewhere with your camera, where you want to take the minimum amount of bag to protect it, but not have a second strap around your neck / shoulders when you take your camera out to shoot.
Another problem, is that you might go somewhere that doesn’t allow you to carry even a small bag into a venue (some art galleries, for example), but you still want your camera on a strap.
Here’s a solution that ads a Blackrapid connector, on a slider that runs along the small bag’s shoulder strap, and which, when you detach the strap from the bag and join its ends together, turns it into effectively a standalone Blackrapid camera strap.
The donor equipment
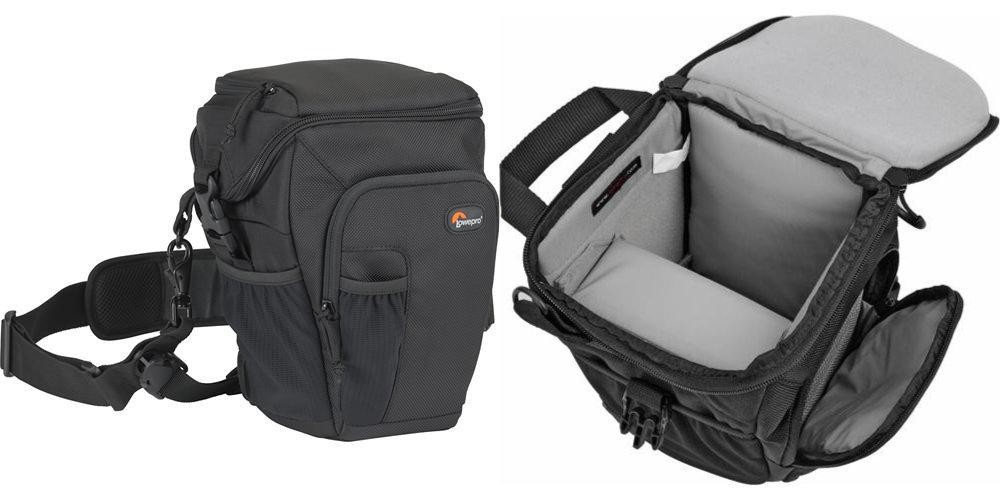
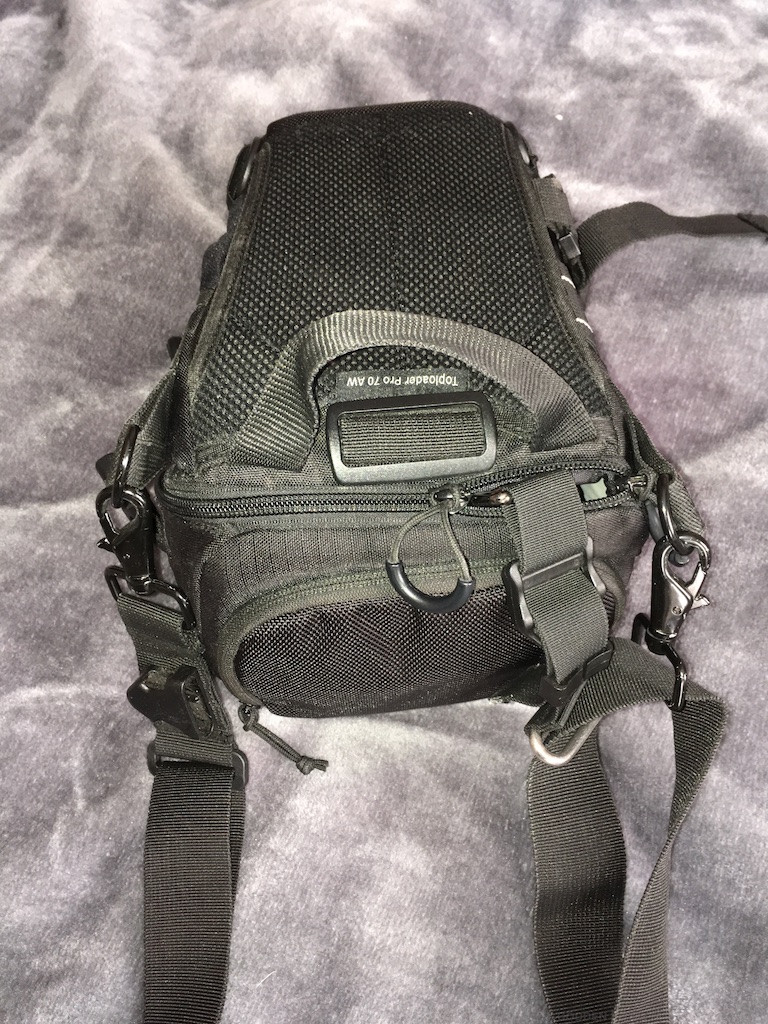
In this case, the bag is a Lowepro Toploader 70AW. This is a bag that can take a full size pro body, with a medium sized lens like a 24-70 still attached.
Lowepro 70AW (discontinued, replaced by the 70AW II).
Two key features of this bag, the first is that the zipper that closes it – it’s one continuous length, even though there’s two zips and a buckle in the middle. That’ll be important later. The second, the shoulder strap clips on at both ends, so can be removed.
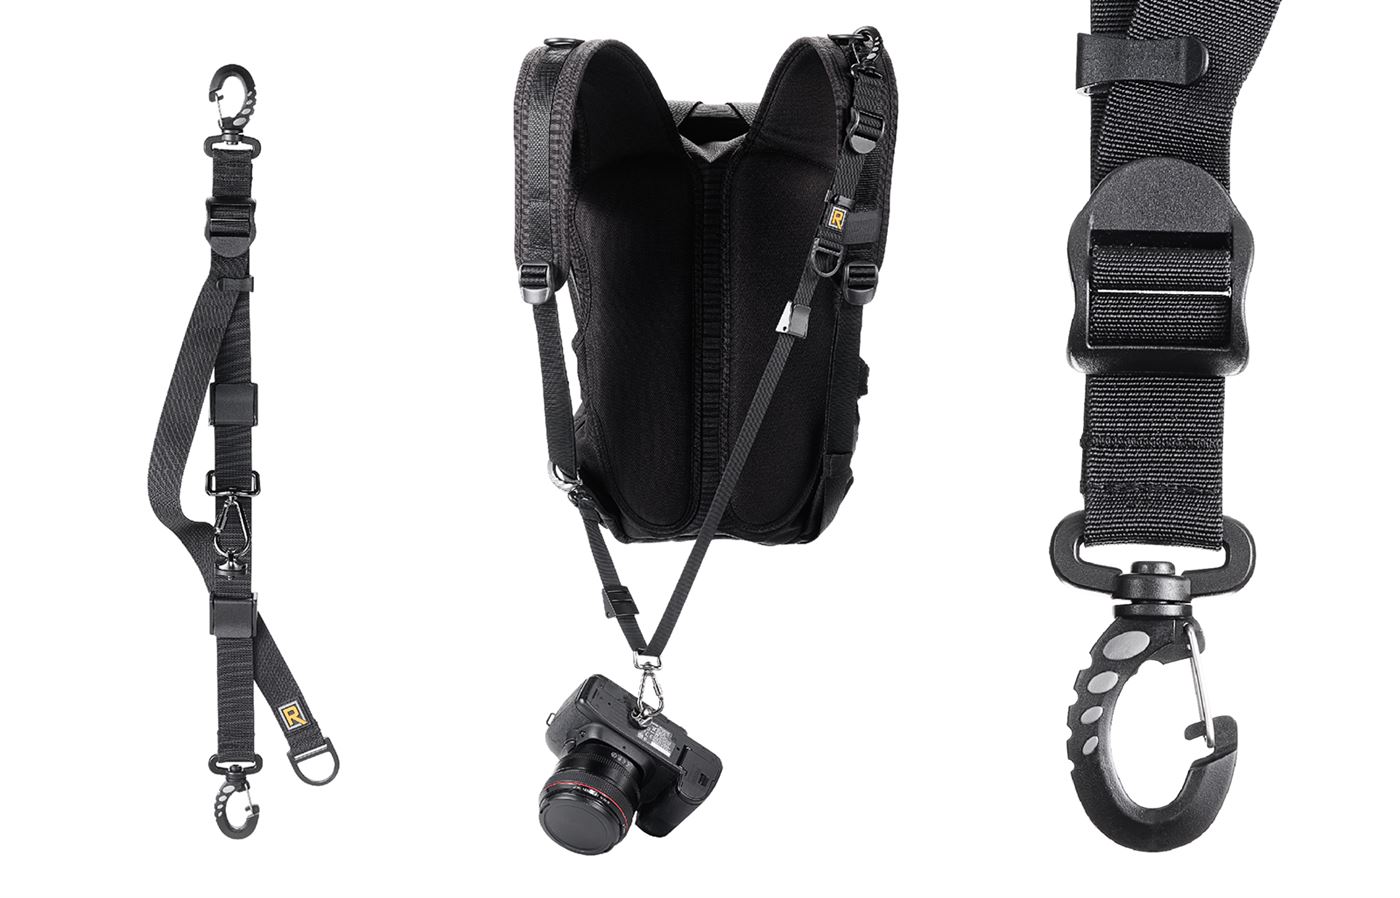
For the dropper to connect the Blackrapid connector, I’m using a Blackrapid Backpack Strap as the donor for all the parts.
Blackrapid Backpack Strap (Discontinued, replaced by Backpack Strap Breathe).
This has the advantage that it comes with all the bits you need – the BR connector, the safety catch to cover the thumbscrew (not shown in this pic), and importantly, the webbing has a loop sewn on the end.
The Backpack strap has two plastic carabiners on it (the updated version only has one). One is connected to the full length of the strap, the other, to a short loop (left and right images above, respectively).
The other parts you’ll need, are a nice smooth stainless steel d-shackle, wide enough to fit the bag’s strap, but narrow enough that it won’t be able to slide over the clips, and off the end, and a safety splitring.
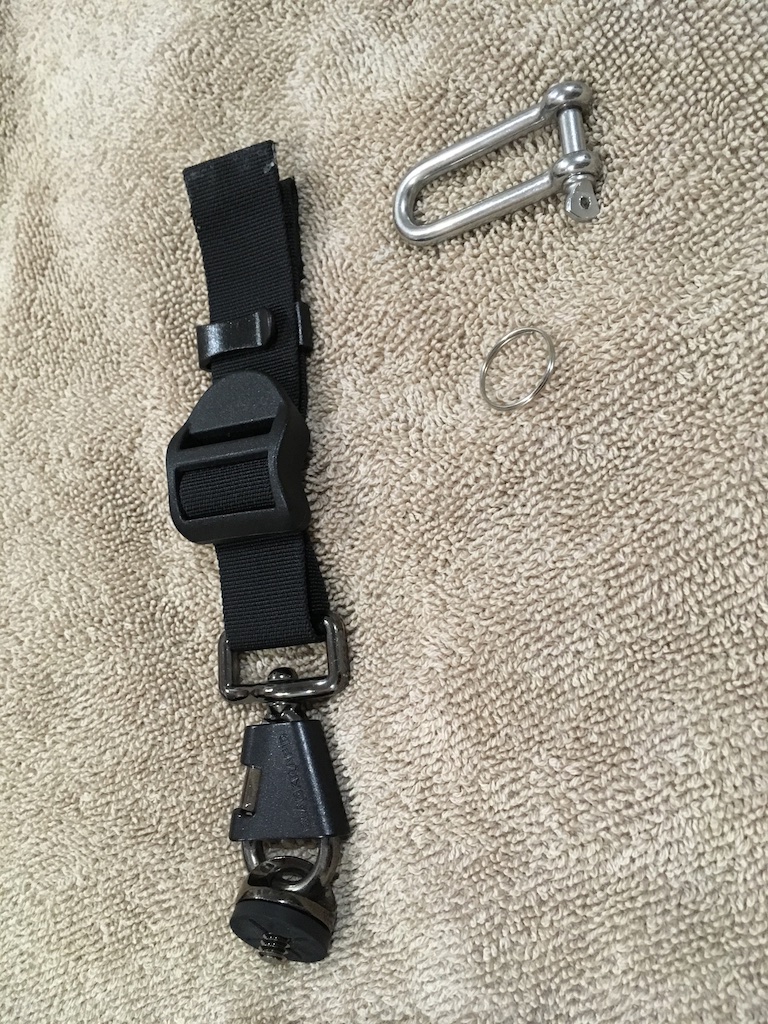
First Step, you need to cut through the eyelet of the plastic carabiner that’s connected to the long section of the strap. The sewn loop on the end of that strap is something we need to preserve.
You need to cut the pull tag (next to the blackrapid logo left pic) off the end of the strap, so you can unthread the full length of the strap from the cleat (right pic).
You need to cut the short strap and carabiner free of the cleat, so you have it as a separate piece.
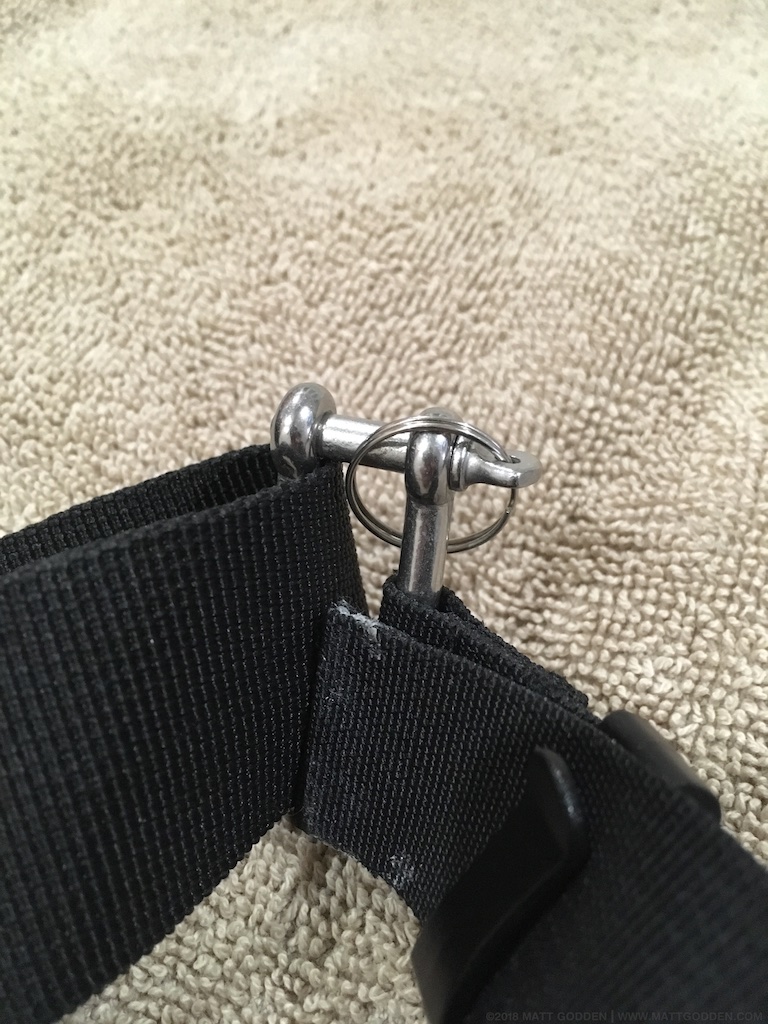
Now, you’re ready to reassemble.
Re-assemble
Insert shackle
Safety splitring
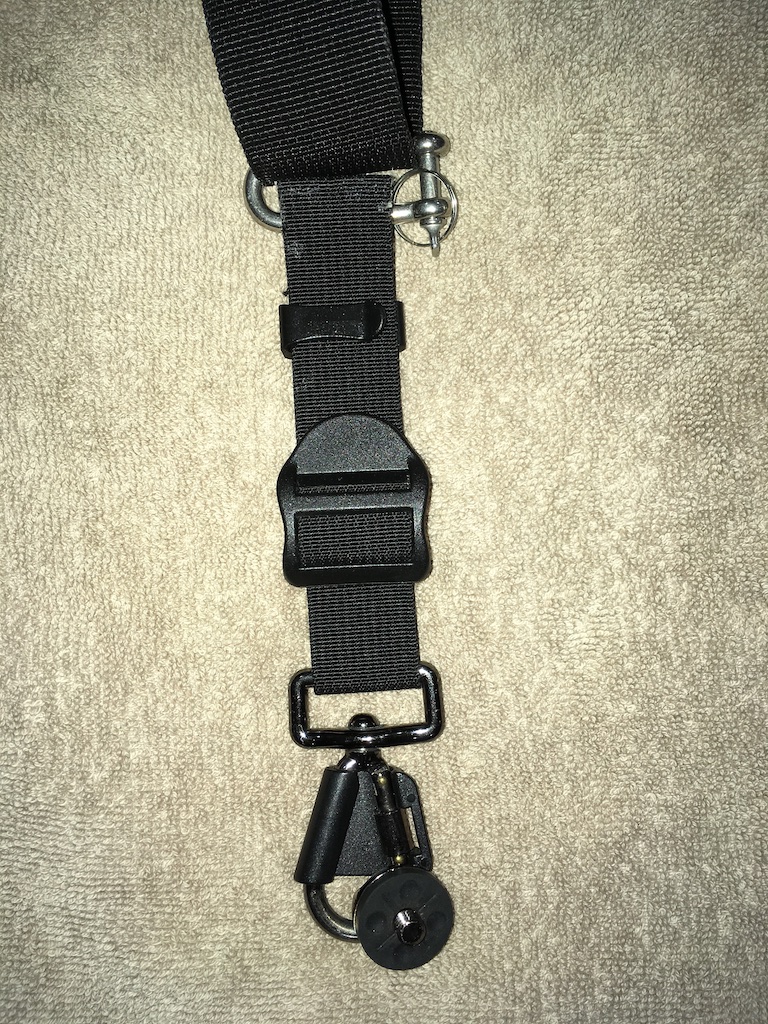
Complete
You’ll want to seal the cut end of the webbing with a bit of fire (I’ll leave it to you as to how to create that). The difficult part is getting it back through the cleat, which isn’t strictly designed for a double layer of webbing. It’s doable, just difficult. When you’re heat-sealing it, try to squash it flat, so it’ll feed through more easily. You could then double it over with glue / stitching so that it can’t possibly go back through.
Don’t forget to thread on the Blackrapid clip in the process.
The splitring is optional, but what it does, is prevent the pin in the shackle from turning, so that it can’t come loose.
Going back to the advantage of the Lowepro bag having a single zipper – once you connect your camera to the Blackrapid you can now put it in the bag while leaving it connected, and then close the bag behind it.
Complete
Zipped away
Not shown – The safety tether I use with any connection system. In this case, I attach it to the shackle, since the split ring means it isn’t capable of undoing.
If this article was of use, a donationwould help support my projects.
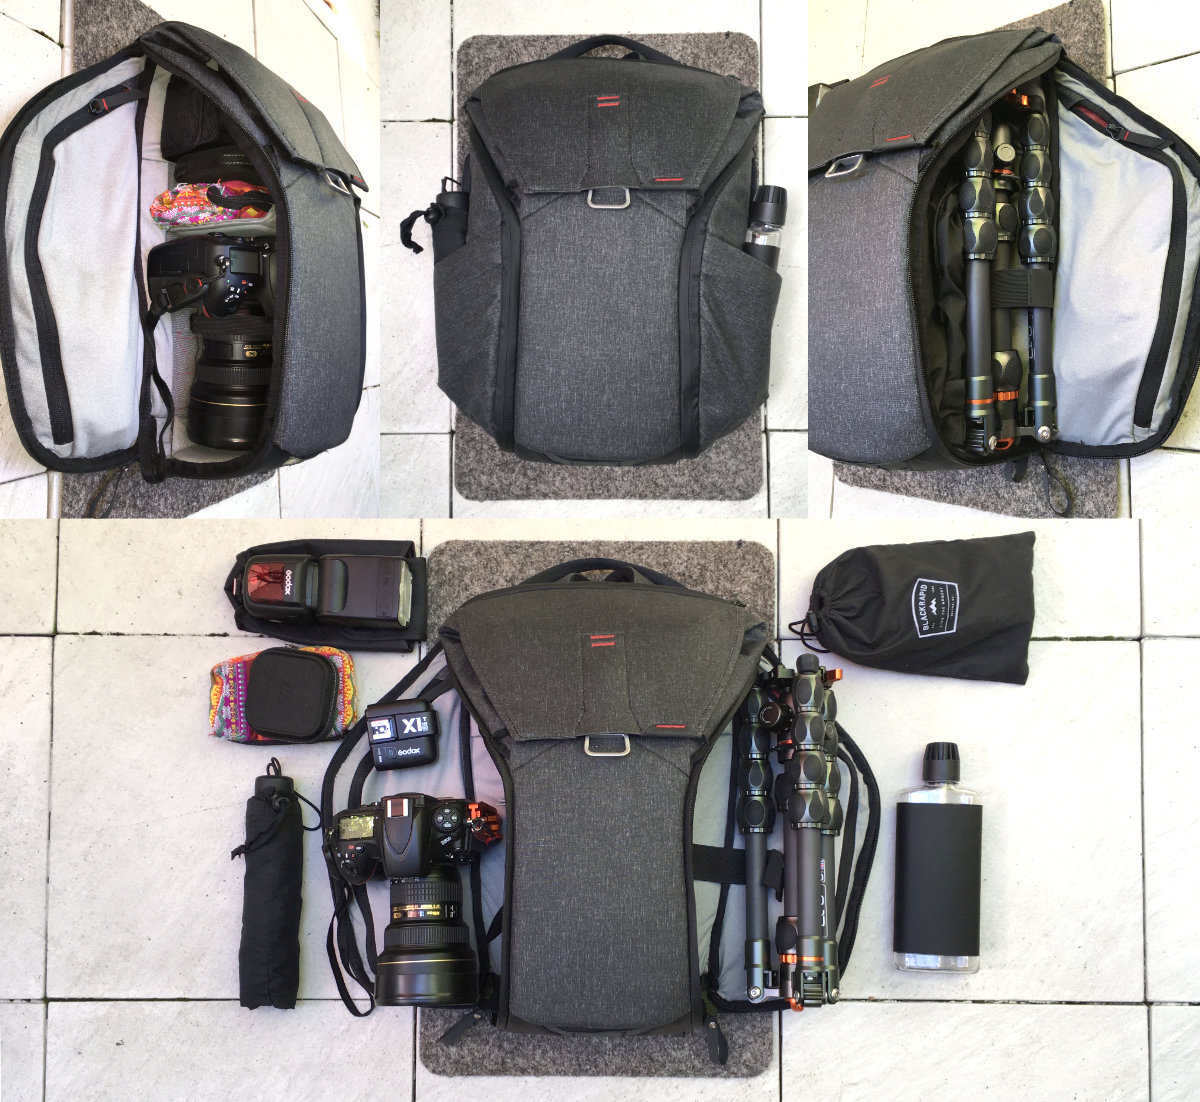
I’ve finally succeeded in getting my Urban Exploration / Urban Landscape photography kit together, so I thought I’d document it here.
Heavy UrbEx.
The goal was to have a single backpack that I could travel with, which didn’t scream “tactical gear bag”, and which could handle a versatile photographic load.
Here’s the loadout.
Peak Design Everyday Backpack 20L, with:
Nikon d8XX with the 14-24 2.8, with a modified 3 Legged Thing QR-11 L-Plate. Umbrella in side pocket. Headphones and small medikit with hand sanitiser, paracetamol etc. Godox V860II & X1-n. Blackrapid Sport Breathe. GSI low-profile water battle in side pocket. 3 Legged Thing Leo with Airhed Switch.
It all packs in very snug, and there’s some modifications to the dividers to scavenge every last millimetre in width across the bag (not such a big commitment now they sell them separately). There’s also lens tissues, lens covers, remote release cable, camping knife-spork and a couple of cable adapters in the interior side pockets. Wallet and a protein bar in the top compartment, and still space for an iPad in the laptop sleeve.
Inside, there’s one vertical divider at the bottom to separate the camera onto the left, and tripod on the right, then one horizontal divider across the top of that.
The horizontal is folded up on the right to make one tall space for the tripod on the right. One layer of the folded up part on the horizontal divider is removed to give 5-10mm more room in the top left compartment. The vertical divider has a layer removed from the folding section as well, to give more room to the L-Plate on the camera, so as to stop the grip from poking out through the side. That vertical divider also has an extra row of velcro sewn onto it, so the whole side adheres to the inner surface of the bag, rather than just the stock tab. The Blackrapid bag packs in behind the tripod in the space it creates where the carbon fibre of the legs is exposed. The trimmed parts removed from the folding sections of the dividers are velcro-ed into the bottom of the bag with adhesive-backed velcro strips, to provide a bit of padding for the lens and bottom of the tripod.
If this article was of use, a donationwould help support my projects.
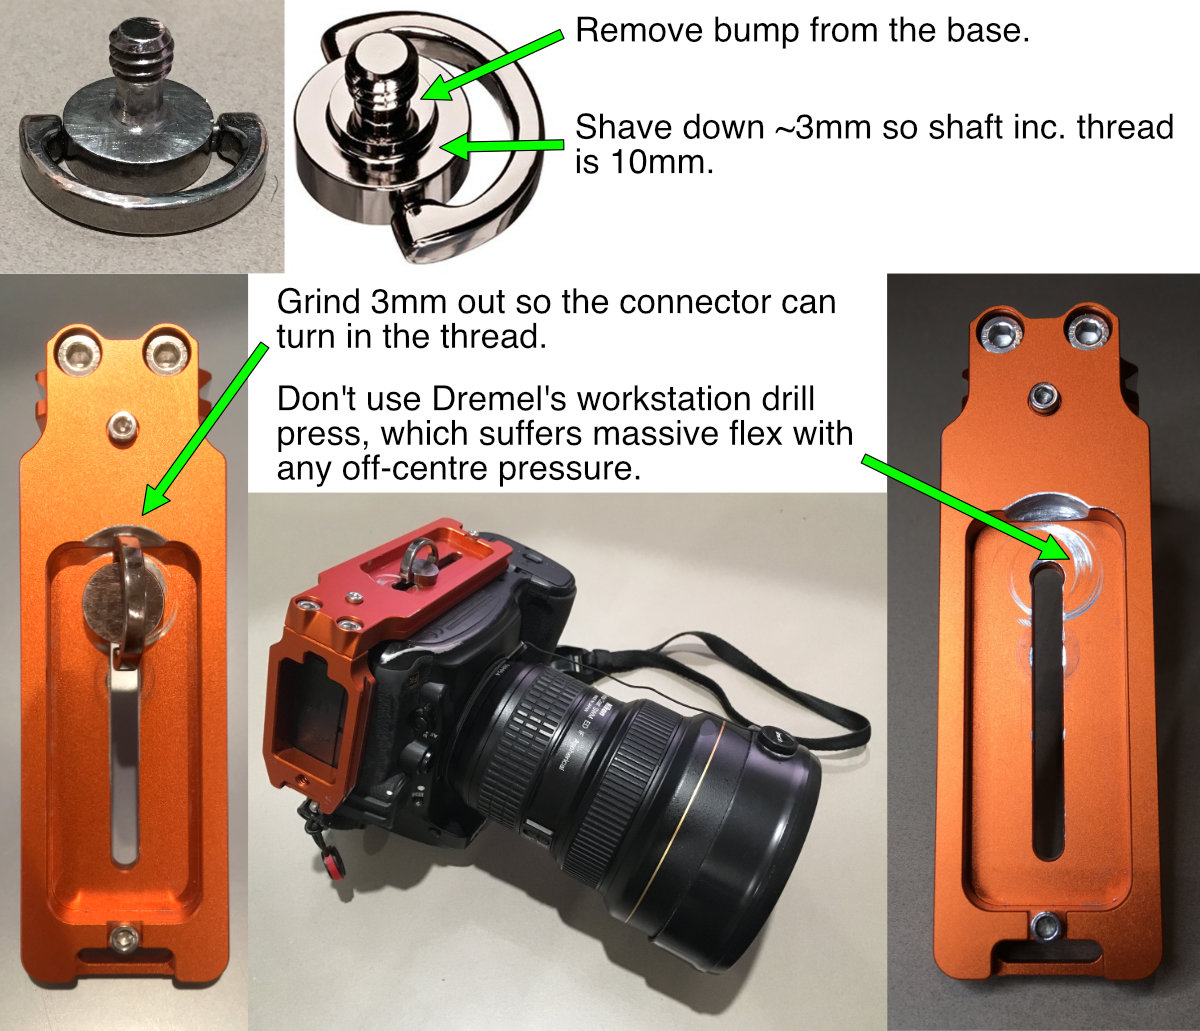
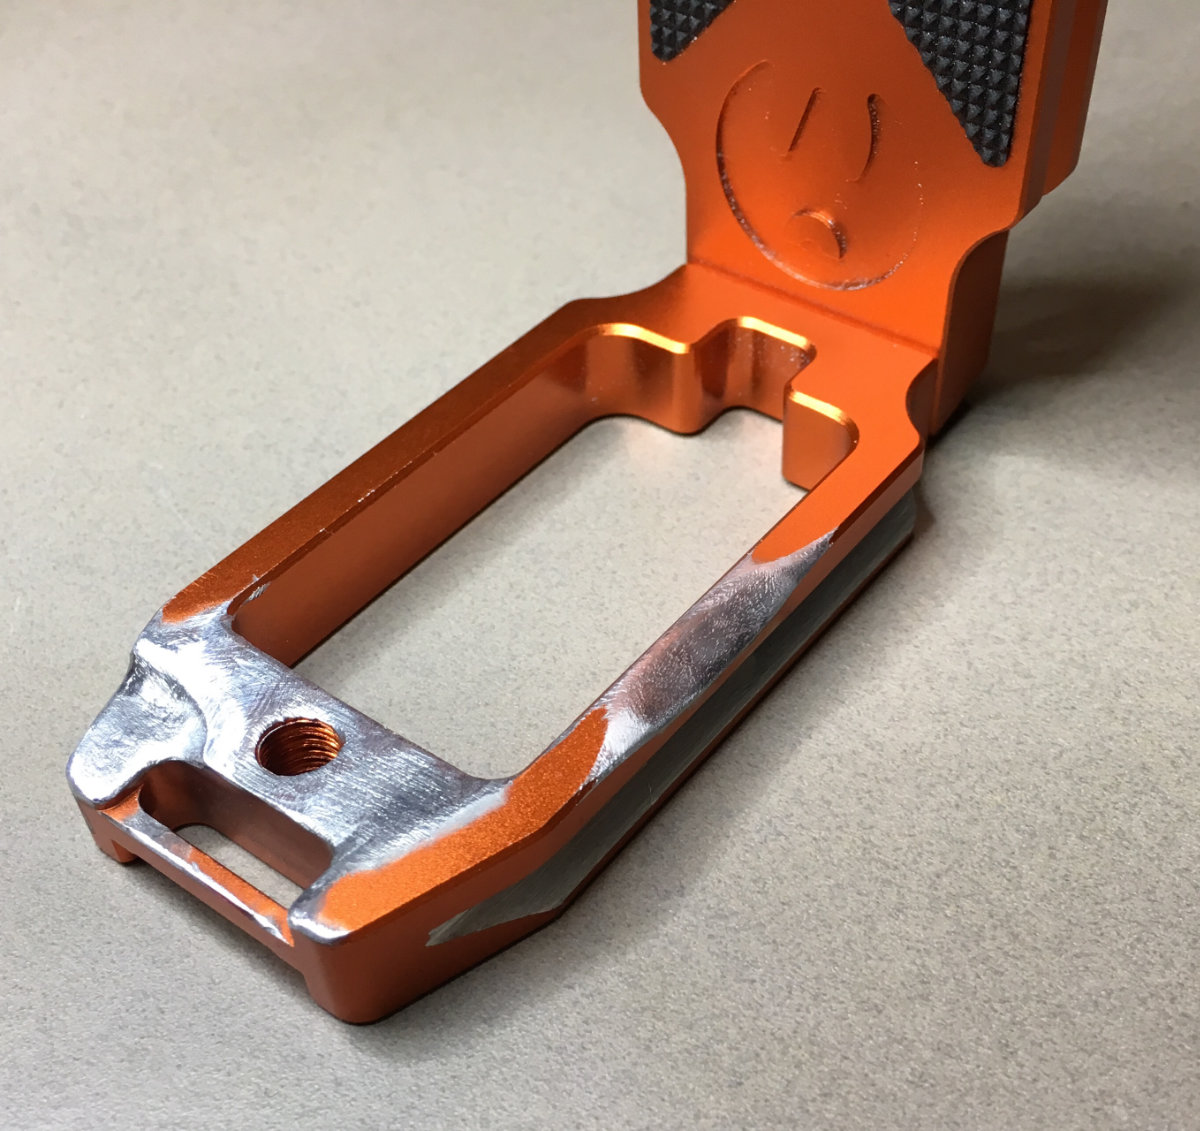
Here’s a gear hack to combine two products that should play well together, but don’t. The Blackrapid FR-T1 connector, and 3 Legged Thing QR-11 L-Bracket.
Instructions
Technically, the QR-11 does work with Blackrapid straps – there’s a 1/4″ mounting hole in the short arm to screw in a Connector, however this interferes with the ability of the short arm’s rail to mount in the Tripod’s Arca clamp. Also, the ergonomics don’t work as well when the camera is hanging on the strap.
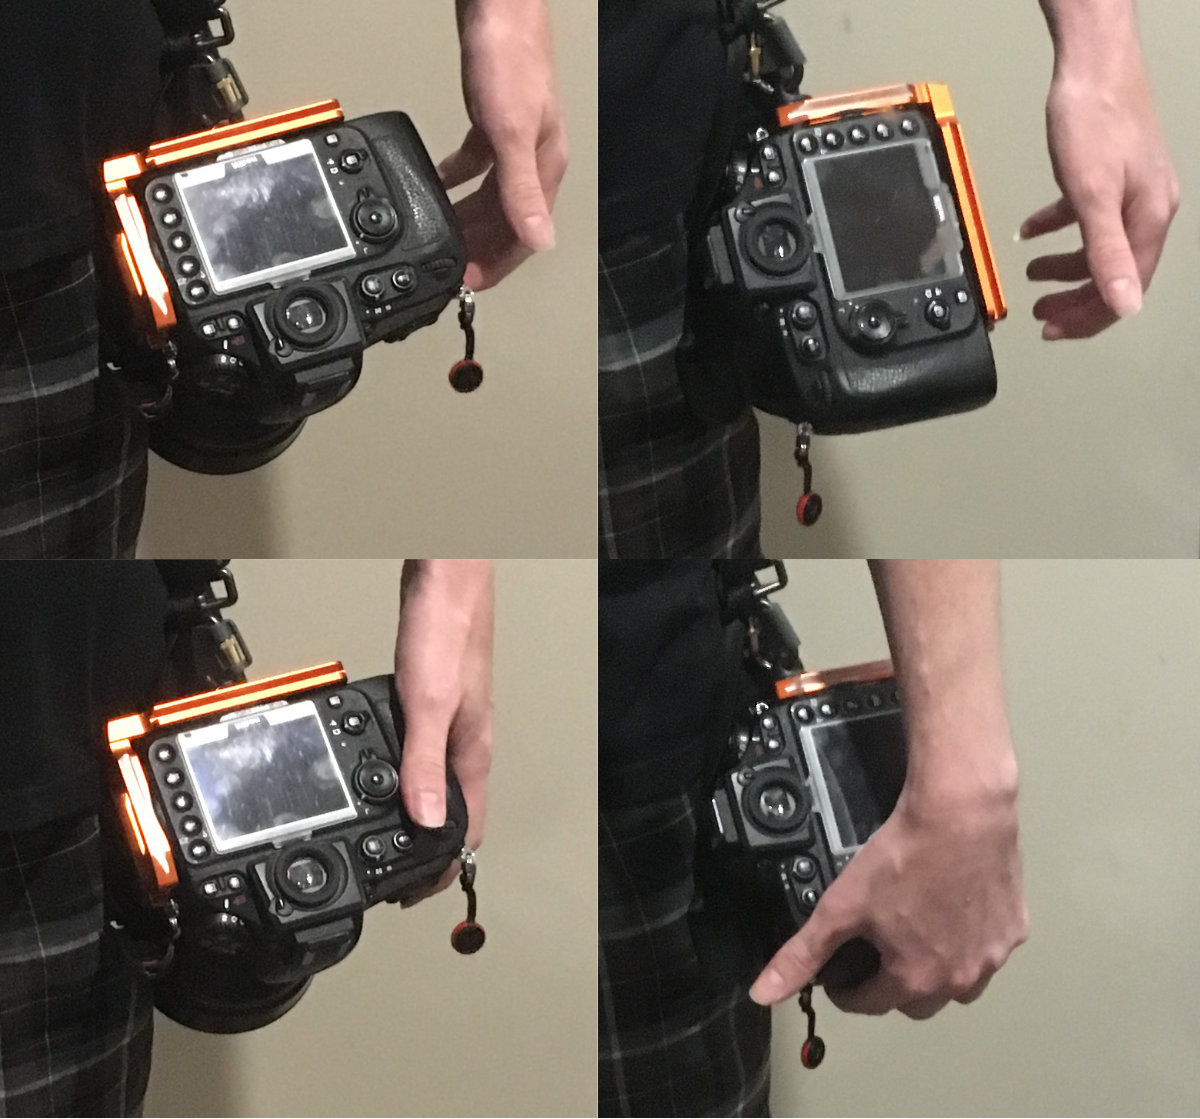
Handling Comparison
As a bonus, here’s a modification of the short arm on the L-Plate, to get it as close as possible against the side of the camera.
Get a snug fit against the camera.
Material needs to be removed to clear the rubber gasket covers for the ports on the front of the camera, as well as the thumbnail catch for the port door on the side.
If this article was of use, a donationwould help support my projects.