This week seems to have brought a conclusion to several weeks of frustrating glitches with my display setup on my Mac. For reference, this is my setup:
Three displays:
a middle main landscape 16:9 27″ display,
left, and right portrait 16:10 24″ displays.
I run a single space for all three displays, so a single menubar in the middle, and the ability to have windows span across screens (useful when working on large spreadsheets). There’s also a piece of software, SwitchResX which slightly over-drives the resolutions of the side displays, so they match the apparent pixel density of the main display.
The main purpose of this setup, is so I can splay all the palettes of my main work applications out over multiple screens, and get everything salient visible at once; all the properties of something are glanceable, and alterable, without having to navigate down into docked palettes, etc. If I need a menu and don’t want to travel back to the top of the middle screen, Many Tricks’ Menuwhere puts the menu as a floating palette under my mouse pointer.
The problem manifested as booting the computer to find my desktop wallpaper had reset to the operating system default, forcing me to reconfigure it… for three displays, and seven spaces for each set of displays. Twenty one separate image or colour choices to configure after each boot.
Thinking the problem may have been an issue with the system finding the directory of my user account on the PCI SSD I boot off, I tried moving the desktop pictures to a SATA SSD, which I knew to be mildly more stable within macOS (it’s seen as an internal disk, whereas a SSD blade on a PCI card is seen as external).
That didn’t really solve it, so I tried something drastic – deleting user and operating system caches. That was a disaster, and resulted in the system experiencing terrible instability; kernel panics every couple of days, in a system that had only had perhaps one a year.
I bit the bullet and reinstalled the operating system in place, keeping my user account and applications. This basically refreshes all the Apple-supplied software, clears caches etc. That sort of worked, in that it changed the nature of the problem.
Now the issue was that when the system would wake from sleep, it would have trouble opening communication with all the displays. These screens are on the end of 7m DisplayPort cables, plugged in to DisplayPort to Type-C adapters, connected to the Thunderbolt ports on my Mac Pro’s main GPU. Waking from sleep would see the login UI jump from screen to screen, as the main screen seemed to struggle to power up in response to a signal.
I knew the main screen worked on its own, because I’d reinstalled the operating system with just it connected. However, one symptom of wake was really odd; in the screen dancing, one of the screens was showing the OS default wallpaper, rather than the one which should have been shown. This hinted a problem was that there was a screen detach event happening, and part of the process was the system “seeing” a new screen configuration, and treating one screen as a new entity, unknown to it so far. After the screens stabilised, and I logged in, the telltale signs of screen detach events were evident – palettes from Affinity applications all messed up on the main screen, because Affinity lacks the ability to recover from screen configuration changes.
I’d eliminated software issues, disabling various tools that interact with displays, that left only hardware; my suspicious fell on the adapter dongles.
On Amazon, I found a UGreen Type-C to DisplayPort 2,1 adapter. A wonderful piece of gear, with a braided cable, and compact metal DisplayPort end. I bought one, put it on the main display, the problem went away. I bought two more, put them on the other displays, the problem stayed away.
This appears to have solved all the problems. It’s hard to fathom an adapter dongle failing, but maybe the old ones (from the same company who supplied the DisplayPort cables) were just an older, less capable technology.
This is a refinement of my workflows for ingesting files from an iPhone or iPad camera, to move them onto my photo archive drive, and allows the removal of Image Capture from the process, which is good because the macOS USB driver can be flaky, and I’ve had at least one system crash from physically plugging in my iPhone.
So, first things first; the relevant file structure. This involves two parts of the filesystem:
I have directories in my home directory (indicated by ~), and then
I have an external drive (actually an NVME SSD on a PCI card) were my photography is kept.
The directories are:
~/Downloads
~/Pictures
~/Movies
/Photo_Drive/Cameras/MyiOSDeviceModel
There are also Camera directories for all of my Camera cameras, where files are manually added, and then have the same processing steps outlined below.
In effect, what this workflow does, is move all Airdropped movies and images to their respective type folders in my home directory, and then, if they’re the original images taken on the devices, shifts them over to the root folder for the respective device on the photo drive, and once they arrive there, they’re processed into a Y/M/D folder hierarchy.
This allows is for things airdropped to jump off the processing train in the appropriate places if they’re not images taken with the cameras on the devices.
So, the way this works is, when you Airdrop images or movies from the iOS device to the Mac, they are automatically deposited:
In ~/Downloads, a Hazel workflow attached to that directory then does the following actions:
If the Date Added is in the last 1 minute, and
the kind is Image:
Move to folder: ~/Pictures
If the Date Added is in the last 1 minute, and
the kind is Movie:
Move to folder: ~/Movies
In ~/Pictures, a Hazel workflow does the following actions:
If the Date Added is in the last 1 minute, and
the Device Model is MyiOSDeviceModel (as revealed by the EXIF metadata in one of its files), and
the Kind is HEIF Image:
Move to folder /Photo_Drive/Cameras/MyiOSDeviceModel
In ~/Movies, a Hazel workflow does the following actions:
If the Date Added is in the last 1 minute, and
the Where From is MyiOSDeviceName (as revealed by the EXIF metadata in one of its files), and
the Kind is Movie:
Move to folder /Photo_Drive/Cameras/MyiOSDeviceModel
In /Photo_Drive/Cameras/MyiOSDeviceModel, a Hazel workflow does the following actions:
If the Subfolder Depth is 0, and (this keep the action occurring in only the root folder)
Date Added is in the last 1 minute:
Sort into subfolder (based on the dates in the image’s EXIF):
(YYYY)
(MM)
(DD)
This final workflow is also used for each camera directory for my non iOS device cameras, so when I directly import images to their root folders (by dragging from a mounted memory card), the same Y/M/D hierarchical folder structures are created / used.
The following is my personal opinion, based upon my personal experiences.
It’s bad enough when an application you rely upon for you work becomes moribund, and seemingly dies; the developer goes radio silent, stops replying to support emails or feature suggestions.
What happens if the app suddenly comes back, but different; like something that has crawled out of the Pet Semetary, and nothing that was wrong is really right again. Now all you have is a weird, uncanny valley horror wearing the skin of your former tool, dressed in its hairless Sphinx cat fursona.
Sometimes, dead is better.
As we wait for October 30th, to see whether Canva is planting the Affinity suite into the sour ground1, another one of our former loved ones is banging on the door, and the smell of damp, of rot, of corruption is seeping into the room. Another joke of the Monkey’s Paw is about to come home, like a hitch-hiker we ran down, determined to thank us for the ride…
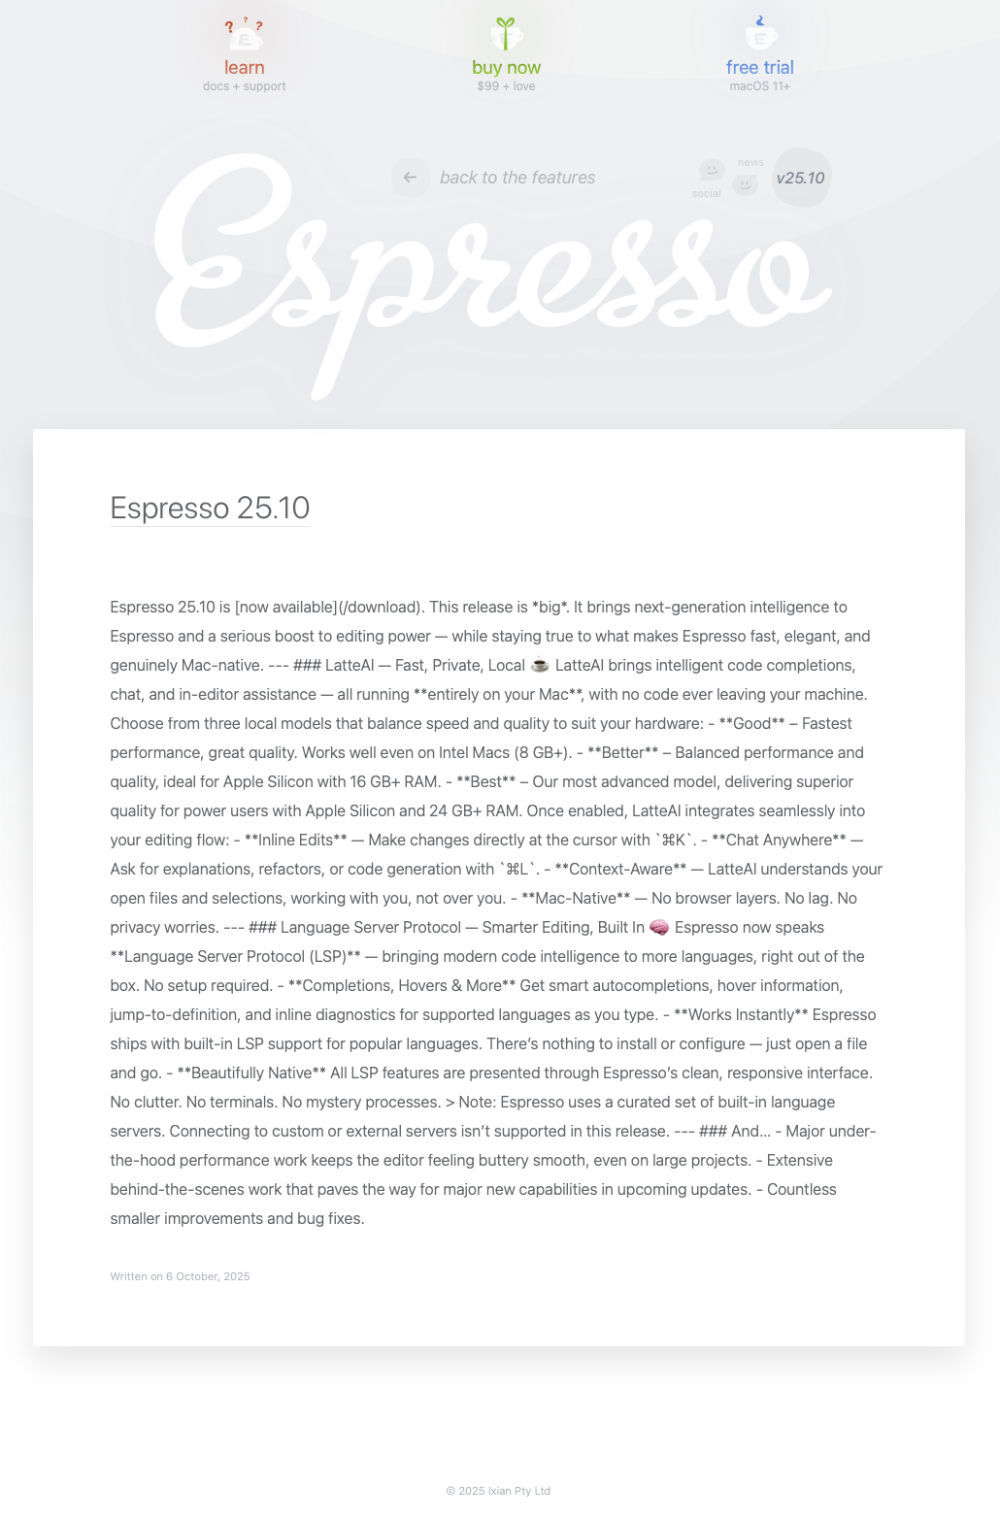
Espresso has a new version, after years of a desolation as profound and silent as that recounted by Xenophon in Nineveh.
I’ve been a Espresso customer for around fourteen years now. I started with MacRabbit, then followed the product to Warewolf software who took over development. Pete Schaffner of Warewolf stewarded the app for a couple of years, until ill health saw him hand off to Matthew Draydon of Kangacode Pty Ltd.
Kangacode Pty Ltd was renamed as Espresso Apps Pty Ltd, with version numbers incrementing up until the last prior release; 5.9.1
Back in October 2021, Matthew Drayton sent an email announcing Espresso 6 was “almost here”, and searching for beta testers.
I had sent a feedback / bug issue about 5.8 in 2022, and there was a quick response from Matthew asking for a copy of the site showing the glitch, which I sent.
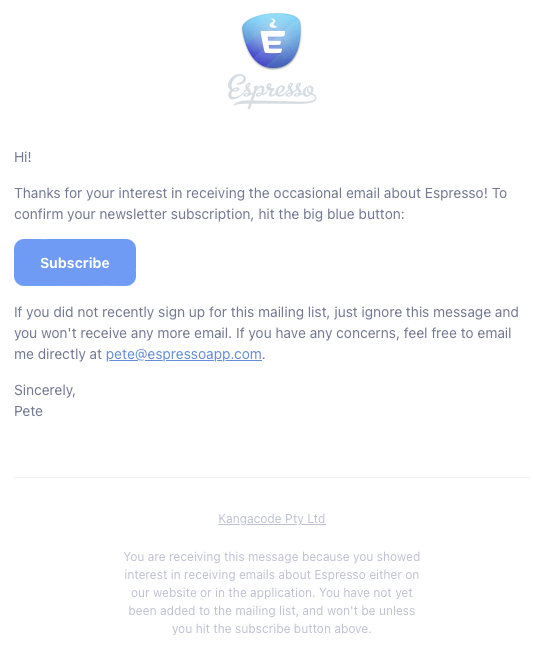
I sent a number of additional feedback / bug reports over the course of 2022 & 2023, none of which received a response. In May 2024 I sent an email to ask Matthew if he was OK, and if Espresso was still in development. Pete had run into health issues, so it’s not unprecedented in the history of the app. That email received a canned response the following day:
…with the previous owner’s name and the “current” owner’s previous company name.
OK, so perhaps Matthew hadn’t fully changed over all the templates in the company’s systems? It was disturbing, but in the pandemicene all sorts of things have slipped.
The current state of Espresso as of 5.9.1:
Eighteen months later, and with the announcement of the new version, it’s worth reviewing the state of the current app. Here’s the biggest bugs, and usability / function issues which I experience while trying to get work done.
The image well for adding a background image to a CSS style:
Dragging an image to the image well results in it shooting back to its origin as soon as it crosses the well’s threshold.
The function to add or customise a logo for a project:
This doesn’t work at all – the logos supplied aren’t applied, and the dropdown to bring up a file picker, followed by using the correctly specified image, fails to apply said image to the project folder. The colour tags however, do work.
Find and replace:
Find & Replace on a project as a whole can’t surface a multi-line search target. Say for example you want to replace a block of code with another block of code in every page of a site.
No Dark Mode:
Dark Mode has been a standard part of the Mac UI since 2018, but it’s not available in 2022’s Espresso 5.9.1.
Feature Deficiencies:
These are things that are not bugs, but more annoyances with missing features (that one should expect), or features implemented in a way that makes life difficult:
No Media Embeds:
I started coding HTML around 30 years ago, and back then I was using an HTML app called PageSpinner which had a nifty (at the time) feature where you could just drop an image into the code document, and it would automatically create the image tags, with all the properties filled in, the relative path to the file etc. Every other editor I’ve moved through since, mainly GoLive and Dreamweaver had this ability for pretty much any type of media with their code editors.
Link Rewrites:
Something else common to most other HTML editors that do site management (have all the files in a site loaded within themselves), is link rewriting. So, if you rename a file, or move a file, the application rewrites every path and link mentioning the file within the site. Sadly, not a thing in Espresso. When I still had a copy that could run on my system, I used to keep Dreamweaver around, with my site loaded in it at the same time to do these tasks.
No Word-Wrap Toggle:
One task you do a lot in HTML is toggling word-wrap on and off. You have it off when you want to concentrate on the shape and structure of the code, you might turn it on when you want to get all the content into an easy-to read space. Most code editors I’ve used have that button right at hand at all times, because it’s such a frequently-used function. Espresso requires a trip through the app’s preferences to turn it off or on.
Complete CSS3 GUI:
Espresso’s CSS editing GUI tools are great, given how much there is to remember in CSS, but they’re not the full suite of CSS3, so you still have to do some things by code – for which there is code completion, so the app does know them, it just doesn’t have GUI tools for them.
Non-Compact CSS:
This is another thing that builds on the CSS GUI, but if you’ve laid out your CSS in non-compact format, with each variable listed as separate properties; like background-image, background-position-x, etc, and then you touch the CSS GUI, all of your carefully set out (and easily readable, self-evident) code gets compacted down into the single background(continuing the example) property shorthand, which makes using the CSS GUI kindof like touching a oven hotplate.
Fixed GUI Proportions:
This is a real bugbear of mine, that a lot of developers do; seriously, stop using fixed proportions for splitting your windows into sub palettes. We had draggable dividers (and tear-off palettes & inspectors) in the 1980s, you have no excuse not to use them now. Choose a different GUI toolkit / API if your current one doesn’t allow it.
Long live the new flesh?
The new version was announced on 7 October 2025 with the following email:
First thing to note, the owner now appears to be Ixian Pty Ltd, the third change of company name in four years. Is this another rebrand of Kangacode Pty Ltd > EspressoApps Pty Ltd, or is this a different company entirely? I’m not discounting the most likely scenario, that a solo developer renamed his company to be something not tied to a specific app, and chose a Dune reference for the name; Ix being the planet of smart machines.
The other option, of course, being that Espresso has been bought by another company, but a search of public company registration records shows the developer’s history of companies:
Nolobe Pty Ltd
Kangacode Pty Ltd
Espressoapps Pty Ltd
Ixian Pty Ltd
…are all registered as residing the same postcode; a small town inland of a regional city, which makes the buyout option seem less likely.
My name is Ozymandias…
Looking at Espresso’s website (as of 09 November 2025), none of the help documentation appears to have been updated for the new version. The release notes are for the new version only, there’s nothing about previous versions, and seemingly no way to download previous versions. The Blog is just the unformatted markdown of the Release Notes page:
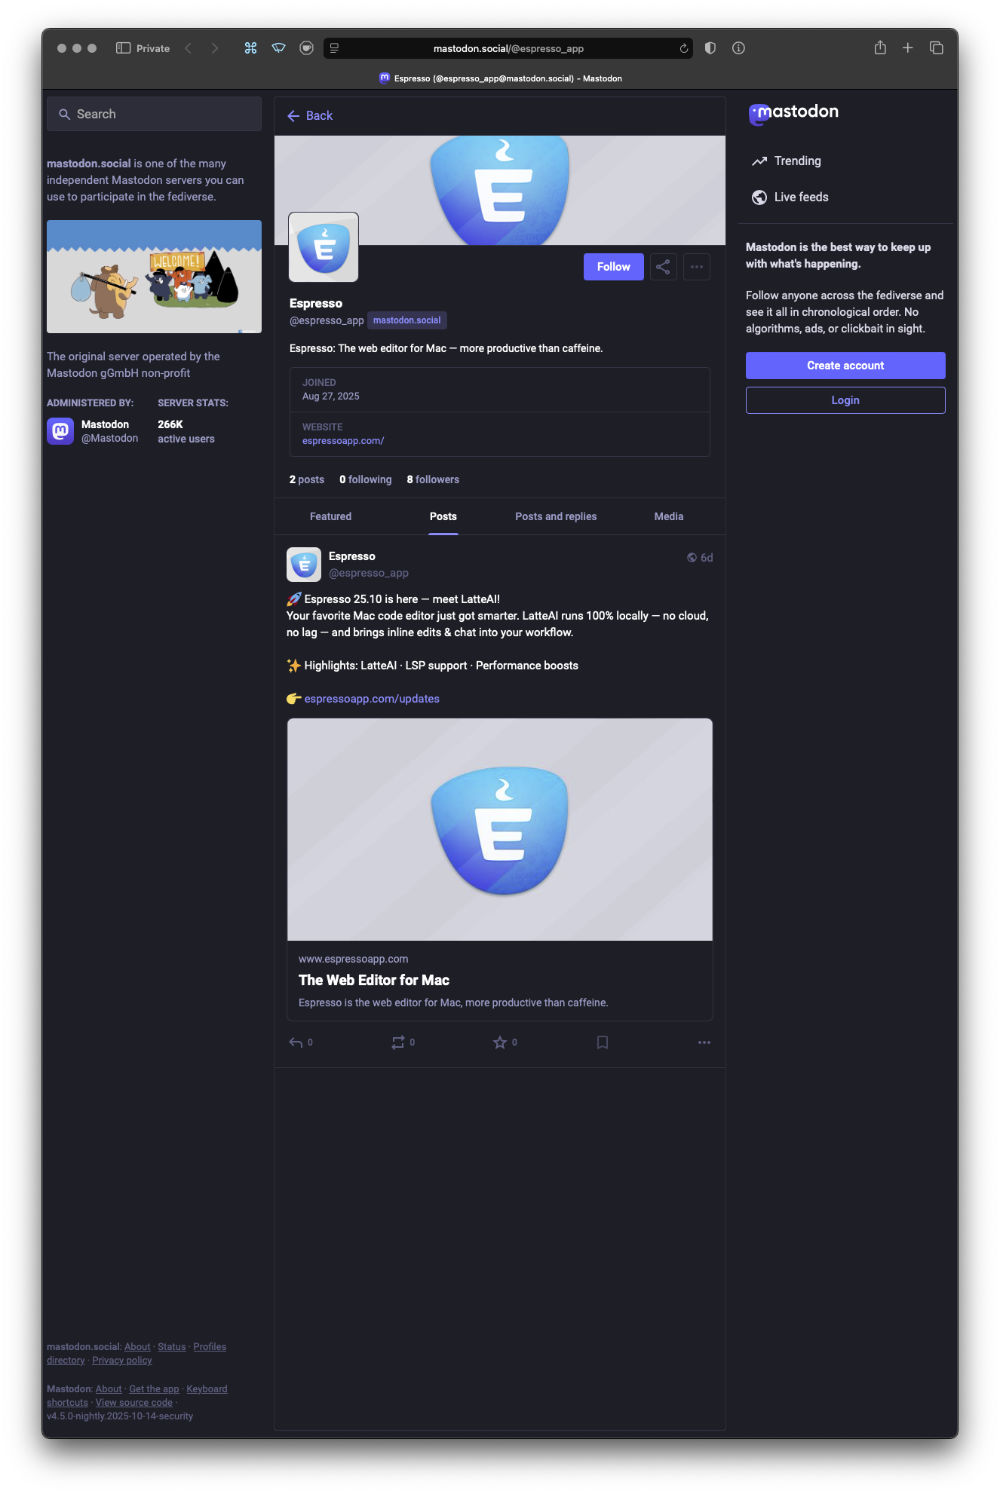
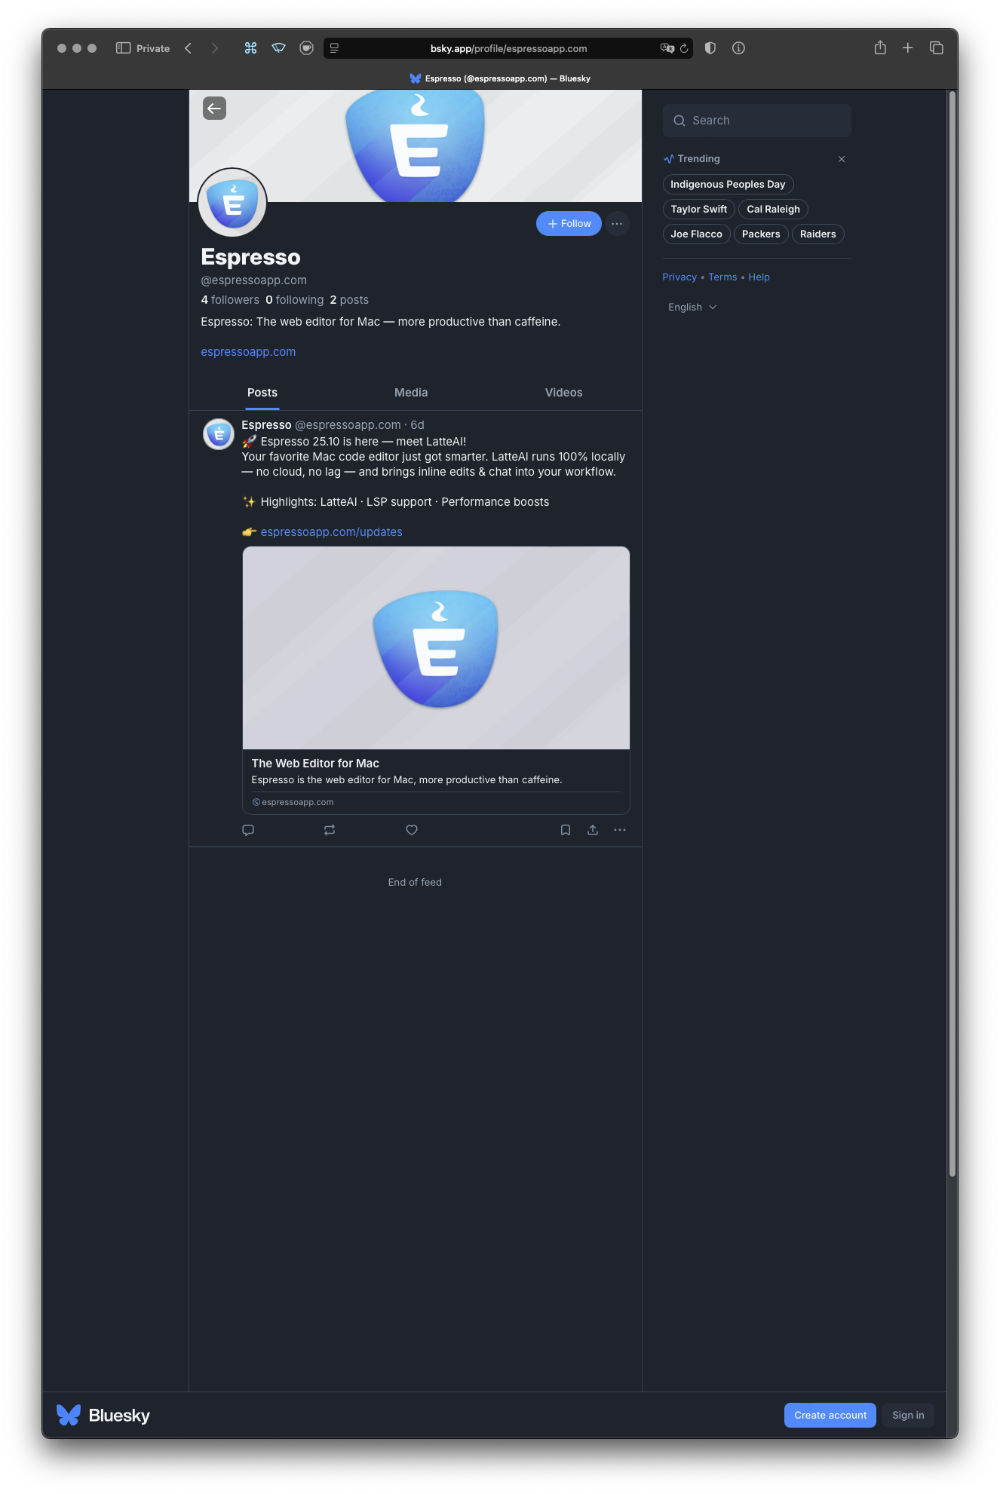
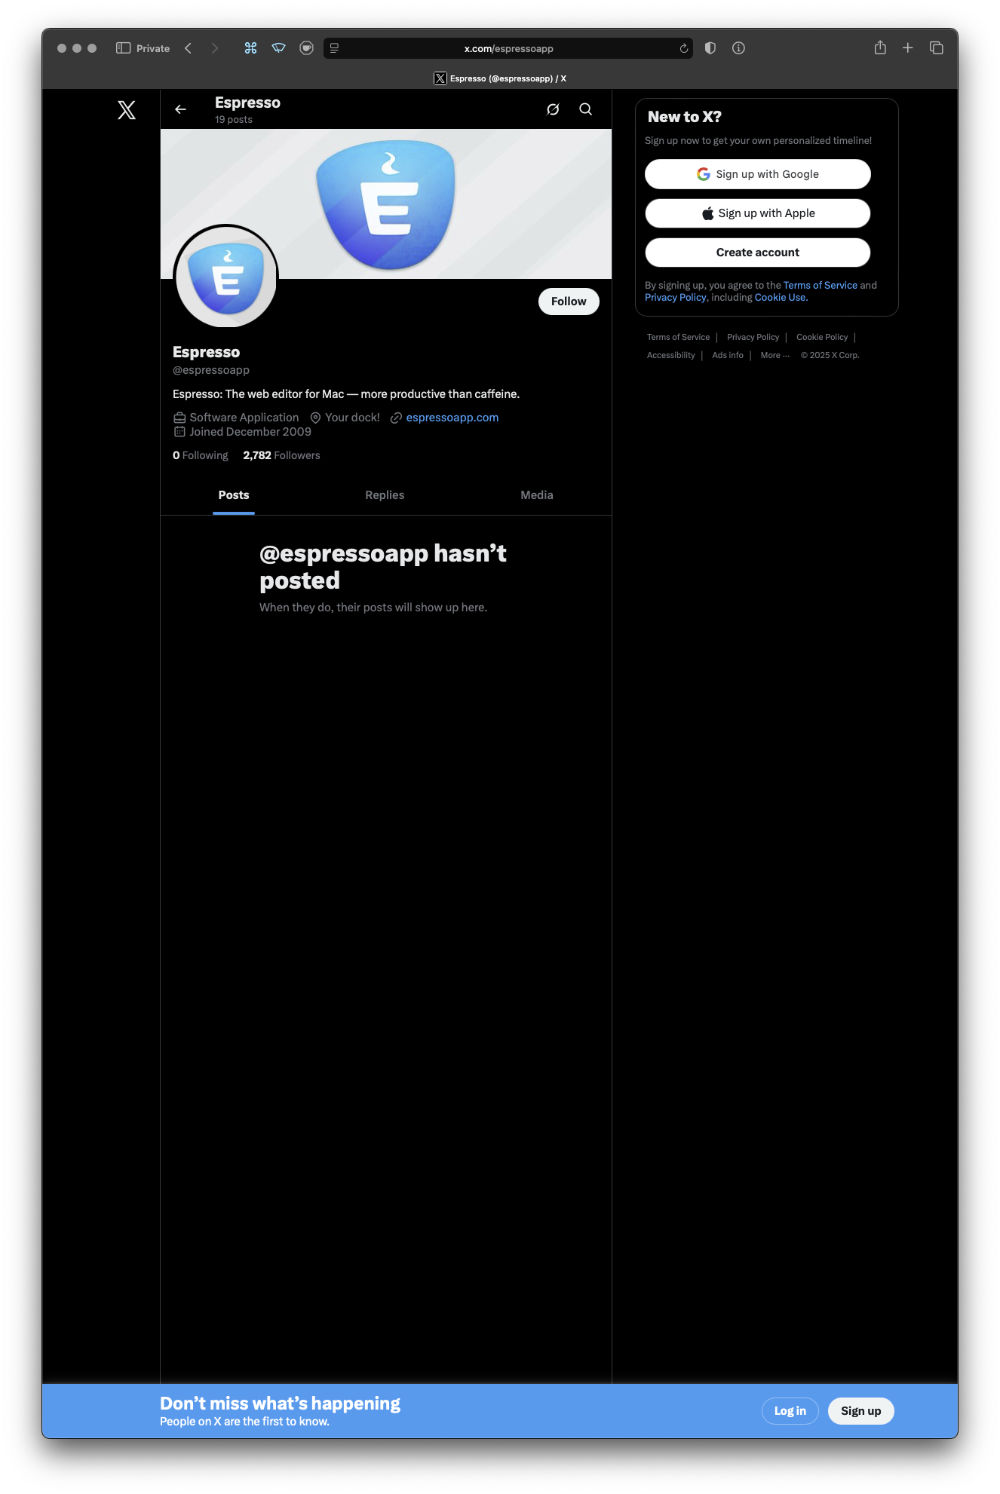
Espresso does have a social media presence on all major platforms:
Mastodon
Bluesky
Formerly Twitter
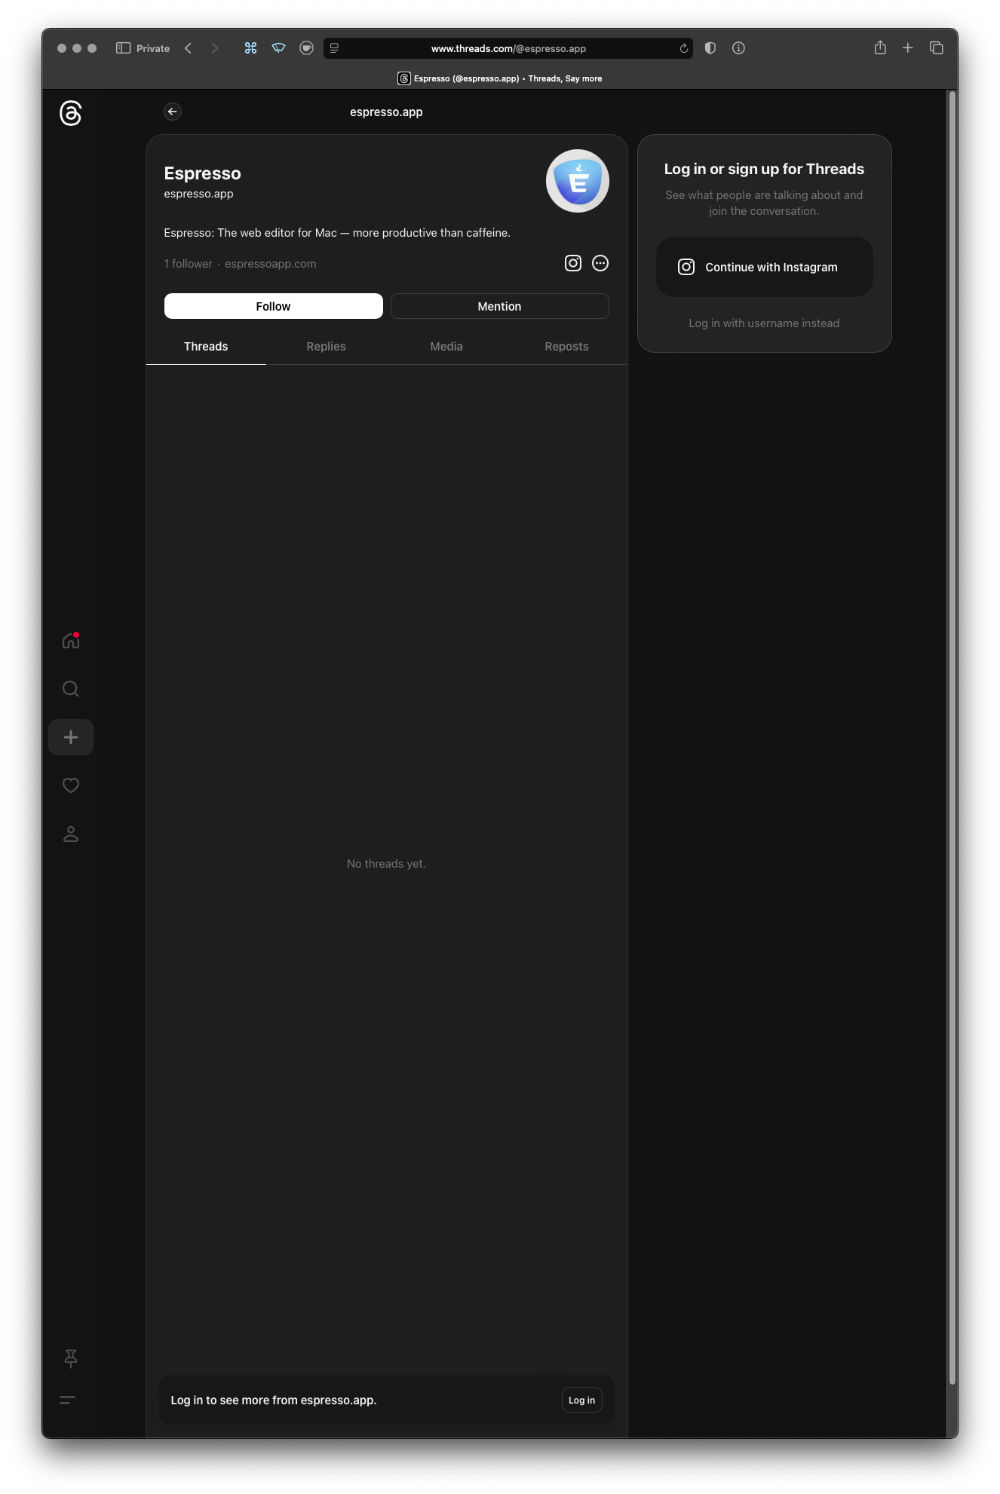
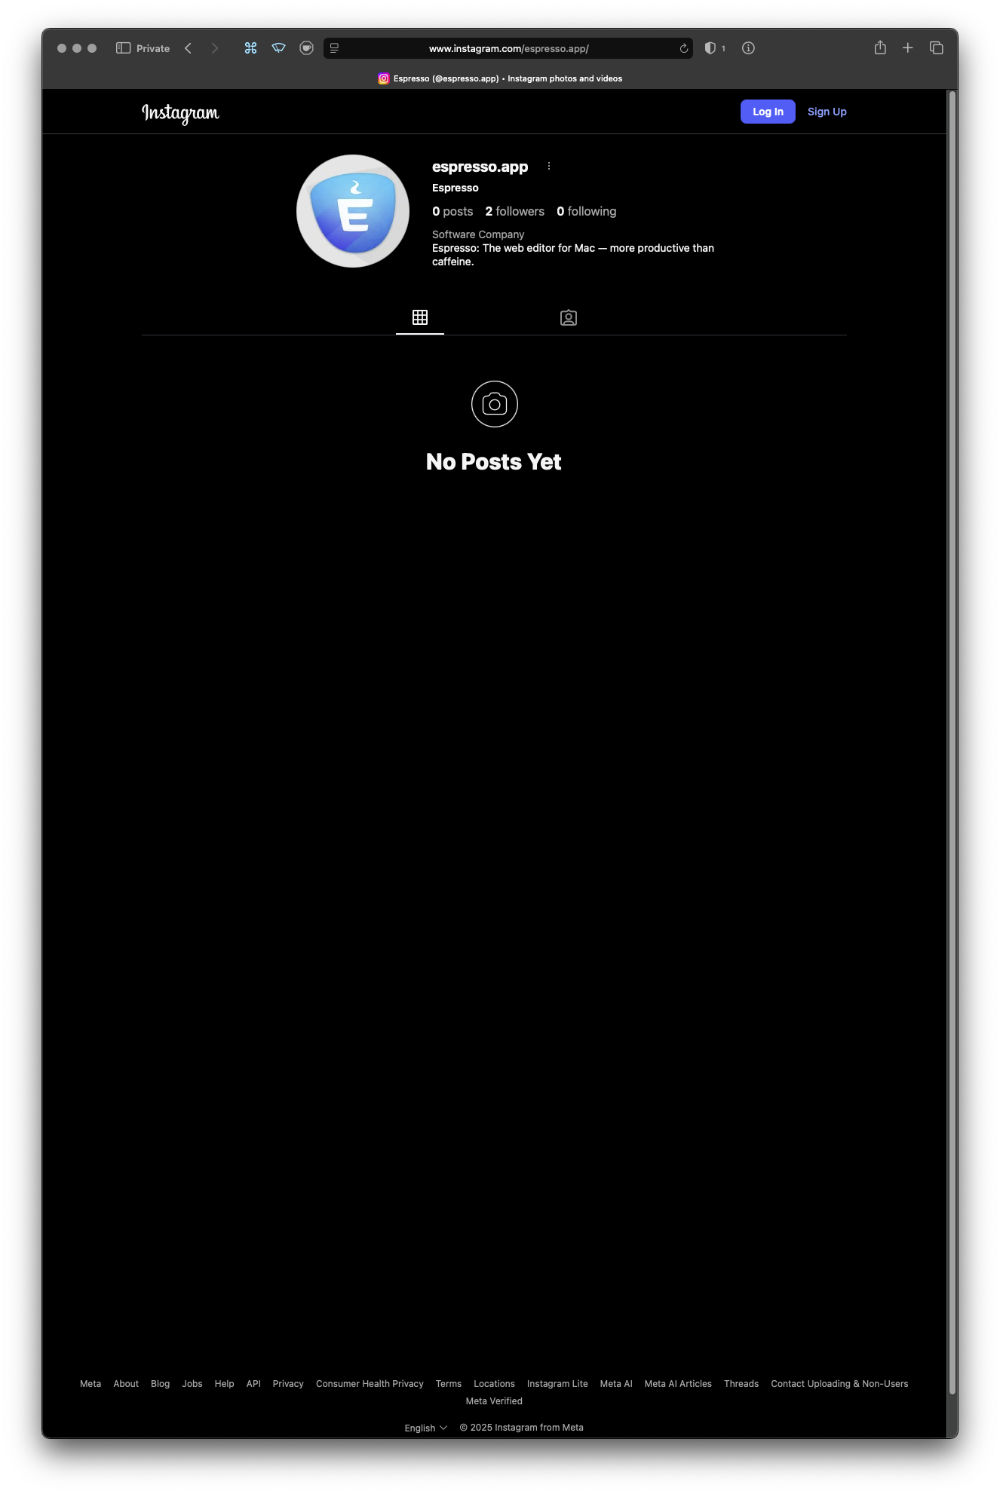
Threads
Instagram
As of 14 October 2025, they’re largely empty. They also (mostly) appear to be brand new accounts.
Looking at the pricing of the product, $99 which I presume is USD$, and $69 for the upgrade from the previous version. Ixian have adopted the new “totally not subscription” (but totally a bugfix / support / maintenance subscription) pricing of requiring annual re-purchases to get bugfixes.
As an aside; I think this entire price model of “12 months of updates and bugfixes” that has swept the Mac world is fundamentally disingenuous, and I think everyone using it is mistreating their customers. When a customer buys software from a developer, they are entitled to receive a product in which every feature works all the time. If there are “bugs”, what they have been sold is a faulty product, and if it takes one year, two years, five years, the developer is responsible for fixing it at their own cost, until they deliver on their original sale.
The argument that the customer gets to keep using the software even if they don’t pay up again doesn’t hold a lot of water if the software is faulty at the end of the 12 months. In the European Union, for example, software has a statutory two year warranty; and developers can choose to maintain old branches of software for two years, or upgrade the customer to whatever version solves the bug, or face themselves forced to issue refunds to customers who can just turn around and re-buy the newer (presumably fixed) version.
This 12 month thing becomes even more egregious when it’s a 12 month window to access updates. I have one piece of software I can’t update to a version that was released within my 12 month window, because I didn’t do the update during that 12 month window; I can’t get an update released 8 months after my purchase, because I didn’t know about it until 14 months after purchase.
Look on my works…
Anyway, I tried downloading the demo, to see what it was like.
It refused to run unless I paid the upgrade fee from 5.x to 25.x.
Well no, I’m not going to pay money for software sight unseen and interfere with my licence when it’s one of my main production tools. So, I declined the offer, and removed the new version from my system.
After my next reboot, I discovered my existing version had been reverted to a demo, with only 14 days usage remaining.
Digging through my email archive, I was able to find my 5.x purchase, and the necessary activation number and to attempt to re-authenticate the software. I was greeted with an error:
“Espresso couldn’t validate your license. An internet connection is required to validate your Activation Number. Make sure you are connected and try again.”
Suffice to say, I was still connected to the Internet. Call me suspicious, but my guess is the activation server is no longer running for 5.x.
Anyway, as they were so keen for customers to reach out if they had any problems, I emailed the address on their site hello@espressoapp.com on the 21st of October 2025, to find out how to re-activate the software. As of November 10th I have received no reply, but I did receive this just after midnight October 29th / 30th:
I forwarded my support email to support@espressoapp.com on the 30th, so we’ll see if “The Espresso Team” respond to that one.
Then I received another promotional email, again in the wee hours, but of the 31st.
As of the evening of November 10th, still no response from “The Espresso Team”.
The dead eyes opened…
So where do we end up? This new version claims to be all-in on AI code tools, but I don’t want tools to know things for me. The problems with Espresso aren’t that I don’t know how to do things in HTML and CSS, it’s that the tool’s bugs and shortcomings get in the way of me applying the knowledge I already have towards my tasks.
The proposition with which we are being presented in this new version, is paying a not insignificant sum of money for a new piece of software sight-unseen, on a 12 months of updates then pay again basis, when the previous version hasn’t been updated in 2 years, and the developer has been radio silent, and non-responsive to support requests for that time.
This lack of response appears to be continuing. When combined with the empty, brand new social media accounts, the website barely updated, and bafflingly updated with raw markdown, the activation servers not working for existing licences, it points to a disturbing lack of care and attention to detail, at best.
It’s frankly baffling how anyone can think this is a viable way to run a business, let alone practice anything.
What is it about AI that seems to make the software industry behave unethically? For example, Microsoft was recently hammered by the ACCC for hiding that you could get an Office 365 subscription without paying extra for AI.
If the public records search on all of Drayton’s former company names hadn’t turned up that they were all located in the same country town by postcode, I would have bet that Ixian Pty Ltd was a Bending Spoons-esque company – someone / something that buys up distressed, neglected software with name recognition, and does a “stuff in some AI and flip an upgrade” business plan.
It looks like this to me, because of the canned announcement emails, the shallow, box-ticking coverage of all social media bases, but with no appreciable content on them, the nobody’s home dead silence to support requests, the inability to authenticate existing versions of the product, and the promotional discounting so soon after launch, but not at launch. That to me, suggests the upgrade sales didn’t happen they had hoped.
There are so many red flags here you’d think we were watching a Revolution Day parade for a communist country.
Gather ’round children, for a tale of a technological, and chronological trainwreck.
It was a dark, and stormy night…
…I was working on trying to bring some old Aperture Libraries into Capture One, and the imports were failing, with an error:
Catalog import failed. The Library is currently open.
Checking Capture One’s support site yielded only a support article about a lock file, but it was for Capture One catalogues not Aperture libraries.
What I should have done right here is file a support request with Capture One, wait for an answer, and stop work.
That sentence is in the voice of me as the protagonist narrator, over a still frame of me about to do the thing I most definitely should not have done.
What I did, as the footage resumes playing, was to try troubleshooting, so I could provide Capture One’s support people with an isolation of the problem.
My first thought was that the problem may be because the Aperture libraries that were failing were those which I had exported from my main Aperture catalogue running on my Mac Mini, while it was accessing images on a drive shared over the network from my Mac Pro workstation. Ok, so booting up the Mac Mini, enabling File Sharing on the Mac Pro, and then enabling the file Sharing user’s access to the photo drive…
Re-exporting the libraries confirmed the problem wasn’t a one-off.
Eventually, what I realised is I had to export the library to a local folder on the Mac Mini, then copy it to the Mac Pro. From there, the library opens fine in Capture One.
So, the problem is that when Aperture writes the library to a network location, it leaves a lock file in place, which trips up Capture One.
Problem solved; I exported all the particular libraries I wanted to re-process to a local drive on the Mac Mini, then copied them across to the Mac Pro, shut the Mac Mini down, and went to go back to Capture One on the Mac Pro.
I filled in a support ticket with Capture One’s support staff, to see if they’d encountered the problem, as I hadn’t been able to see it described in their support site.
As an aside; If you’re setting up a support site for a piece of software, why not try structuring your knowledge base of answers based upon the menu structure of the program. So if I have a problem with the function File > Import Catalogue > Aperture Library, let me navigate to that and see all the issues related to importing Aperture Libraries.
Knowing I wouldn’t need to continue having file sharing on, I disabled it, and then removed the sharing user from the Photo drive permissions.
Then Time Machine began to run… and continued to run… a lot longer than it usually does. Once it had finished, I noticed that rather than the 1.5TB of free space my Time Machine drive should have, there was now only 80GB of free space. Thinking backwards, the horror of what had happened began to dawn upon me (is this sounding like The Martian where he shorts the probe with the drill?).
By performing a recursive addition, and then removal of a user permission from my photo drive, I’d somehow caused Time Machine to think the entire drive needed to be backed up afresh. That may not have been so bad, except for a decision by Apple engineers; on a 4TB drive, there should be a minimum of 80GB of free space on a Time Machine backup. So despite the entire new backup fitting within the space available on the drive, Time Machine deleted two months of my oldest backups to free up that extra space.
I went into the commandline, and using the tmutil command, removed the new giant snapshot, but unfortunately that didn’t liberate any space on the drive. I ran Time Machine again to see if it would do the same huge backup a second time, and it didn’t, but still no liberation of space. Deciding I was tired of fighting with it, I decided to take the drive (and it’s twin which had avoided the problem) out of service entirely, they’re now stored in split locations having served only 14 months of use.
So, I brought in a new pair of drives, 8TB this time, and we’ll see if Time Machine can behave in a more orderly fashion this time around.
Eventually I heard back from Capture One’s support folks; the Aperture lock file is located in the Library’s package contents in:
I recently encountered an interesting glitch with my Finder-based Zero DAM setup. I was looking for photos I knew I had taken, but they weren’t showing up in the timeframe I knew they should be appearing, for the camera I knew they had been captured upon. Eventually I managed to find a couple of the images from the day’s shooting, but it was only two out of ninety-two images. So what was up with the others?
In terms of their EXIF data, and their Finder properties, there was no discernible difference between the images Spotlight could find, versus those which seemed invisible to Spotlight-based Finder searching.
More perplexing, turning off spotlight indexing for the drive made the images reappear in searches based upon the date the images were photographed. Turning indexing back on, made the images disappear from the search results within a minute.
So, something about Spotlight’s indexing process was excluding the images from any sort of spotlight-based search. I tried pretty much every method for deleting the spotlight index for the drive, without success; as soon as the index was re-enabled, the images disappeared.
Then, I started to think about one issue macOS has – Extended File Attributes. These can cause all sorts of problems, so I installed Xattred from Eclectic Light and compared the files which Spotlight could find, with those it could not.
Deleting this attribute from the file made it instantly show up in Spotlight searches.
The question; how to do this for any file on my photo drive, when I couldn’t use spotlight to find or identify them. After a bit of searching online I came across the answer using terminal:
xattr -rd com.apple.metadata:kMDItemSupportFileType (drag the target location here)
Something on the order of a thousand photos which were effectively missing in my Zero DAM system instantly reappeared as I applied this procedure to camera directories (it’s recursive, so will apply to the contents of any subfolder) where I had identified “missing” images.
One of the issues with the EPUB workflow, is that EPUB documents are .zip compressed. This makes proofing & previewing while you’re working problematic, as some reading apps can’t deal with uncompressed documents. With Apple’s deprecation of EPUB authoring and proofing support:
…proofing on an iPad became a pain point that made the work simply not fun to do.
I’ve been thinking about a solution to this on and off for a while now, and a solution hit me that has obviously been percolating up for a while.
Use iFrames.
iFrame-based layout in browser.
I don’t know why I didn’t think of this sooner, but the solution is at once clever, and so straightforward it makes me feel stupid for having not seen it earlier.
What you do, is set up the entire document of facing pages using an iFrame for each page, and then set the iFrame sources to the xhtml files inside your EPUB development directory.
html, body {
 margin: 0;
 padding: 0;
}

body {
 background-color: gray;
 transform: scale(0.5); /* set the zoom degree to view */
 transform-origin: 50% 0; /* centres the zoom in the middle of the browser */
}

iframe { /* the width and height of the EPUB's declared viewport */
 border: 0;
 width: 1200px;
 height: 800px;
 margin: 0;
 padding: 0;
}

#the_container {
 width: 2400px; /* double your EPUB's viewport width */
 min-width: 2400px;
 margin-right: auto;
 margin-left: auto;
}

#the_container div {
 margin-top: 10px;
 margin-bottom: 10px;
}

.spread {
 width: 100%;
 display: flex;
}

.rightonly {
 flex-direction: row-reverse;
}

.doublepage, .leftonly {
 flex-direction: row;
}
The nifty thing is the transform scale and origin in the body tag’s CSS, so you can scale the whole thing down if the spread won’t fit in your display’s available space, or if you want a more document-wide overview.
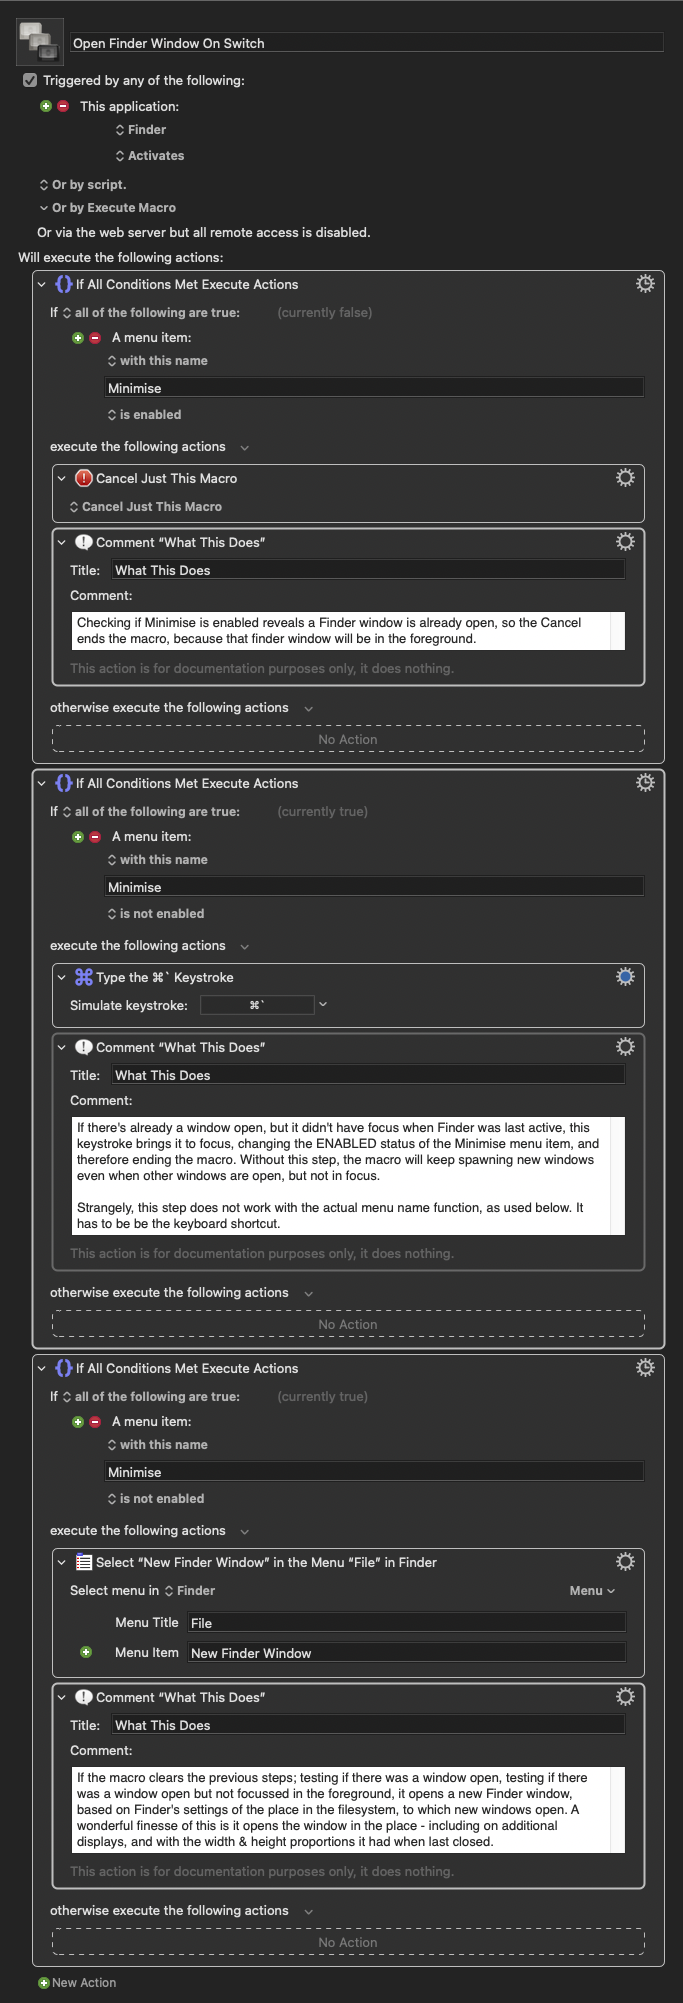
Finder in macOS has a behaviour that when you switch to it from another application, and there are no other Finder windows open in your current space, it should automatically open a new window to the user’s chosen default location.
Unfortunately, this behaviour isn’t reliable – it will do it once, but then not do it the next time. The problem being that if it fails to spawn the new Finder window when you switch to Finder, pressing the dock icon a second time will transport you to a different space that does have an open finder window.
Thankfully, Keyboard Maestro is here to save the day. To be clear, what really saved the day, was the Keyboard Maestro user forums, whose helpful denizens supplied the solution to this. Here’s the workflow, with documenting commentary included within.
This macro activates when switching to Finder from either the Dock, or by clicking on the desktop, and ensures you always have a file browser window ready to go when you switch to Finder.
Edit December 2025: You may want to be careful with this. I’ve noticed a correlation between having this macro enabled, and Finder’s preferences becoming periodically corrupted, such that the sidebar items will randomly disappear. I’ve disabled it for now, to see if the problem resurfaces.
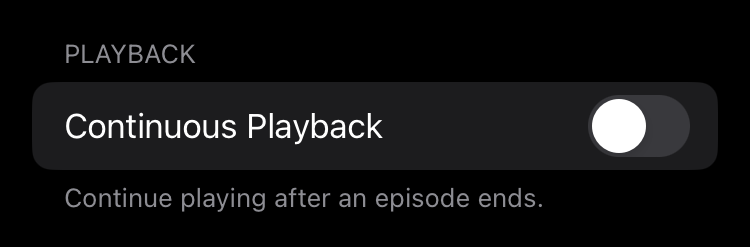
That should seem like a obvious answer, right? Once an episode ends, the app stops playing, and remains so until the user interacts with it to manually play another episode.
That’s not the way the application behaves. What actually happens; if you have multiple episodes of a particular show on your device, stored locally within the Podcasts library, and you play one, all the remaining episodes will be put into the “Playing Next” queue. Each episode will be auto-played after the previous finishes.
So this is a setting to disable or enable Continuous Playback, that doesn’t have any effect on whether Continuous Playback happens, because Apple is a company that has no respect for the concept of Consent.
The user does not explicitly consent to Continuous Playback.
The user actively signals that they do not consent to Continuous Playback.
Yet, Apple goes ahead and does Continuous Playback to them, regardless.
Don’t ever leave your drink unattended with someone from Apple’s Podcasts.app team. Too harsh?
The purpose of a system is what it does.
The biggest company in the world, and the people who work there do not deserve the benefit of your doubt. They would fix this if they cared. They would fix this if they found the idea of software ignoring user consent to be offensive in some way. They don’t, because they don’t.
Mona is a client application for Mastodon servers. It allows you to do all the things you can do on Mastodon, in a much better UI than a web browser can provide.
In intent, in its radically wide scope for user customisation, in its support for old devices back to iOS 12, in its single purchase / perpetual licence pricing structure, Mona is a fantastic application, especially as the result of a single developer. It is, quite simply, the best Mastodon client for someone in the Apple ecosystem.
Mona is better than vanilla Mastodon, in much the same way that Tweetbot was better than vanilla Twitter. It also furnishes capabilities the standard Mastodon experience lacks; quote-posts, for example. It doesn’t matter if mastodon.social doesn’t have an official quote-post format, if everyone uses a client that presents links to posts as if they were being quoted, your experience of Mastodon becomes one in which quote-posts exist.
Mona is what made Mastodonusable for me, in the same way that Twitter killing third party clients, like Tweetbot, made Twitterunusable for me.
What is it that makes a social media platform “usable”, in my eyes?
It comes down to this; a social media platform, which features chronologically delivered content, needs to have:
a native application on each of my devices, and
that application has to keep my reading location in my feed synchronised.
What do we mean by native application?
I’m not interested in using a web browser to view a social media platform, or a web page packaged in an application frame. I’m not interested in Electron “apps”; I want a Mac application for when I’m on my Mac, an iPad application when I’m on my iPad, and an iPhone application when I’m on my iPhone. As a side issue – I’m not interested in native apps for social media networks that are made by the social media network itself. Your social network is only as good as the third party apps it supports.
What I especially don’t want, is some “sortof works everywhere” compatibility technology second-class application on all three. Unfortunately, that’s what Mona is. Mona is a Catalyst app.
Catalyst is Apple’s version of Electron; only instead of allowing web pages to impersonate native software, it allows iPad apps to pretend they’re real Mac apps. Apple have supplied plenty of them on your Mac already, and it’s no surprise they’re the ones that feel off. They’re the janky apps that don’t have proper contextual menus with all the expected entries (like text transformation options), where spell checking doesn’t work the same, where the keyboard shortcuts don’t work right, where text selection of a single character with your mouse is difficult, where window resizing doesn’t look the way it does on your proper Mac apps. Apple’s Messages, Music, Podcasts, Books, Weather – all of these janky, brittle-feeling applications are so, because they’re iPad apps masquerading as Mac apps.
Mona is one of these, and shares all those characteristics. It’s better than using Mastodon in a web browser, but it’s worse than a proper Mac app. This is not because the developer is a bad person, or that the ideas behind Mona are bad ideas; it comes down to Catalyst being a badly implemented technology, which at its absolute best can only produce second-class applications on macOS.
For example, sometimes the main timeline in Mona will just stop accepting clicks. All the other tabs in the UI will be fine, however the main timeline will be scrollable, but inert. You can call up a second instance of the main timeline, it will be fine, but the only way to clear the problem, is to quit and relaunch the app. Sometimes, the app will return your timeline to where it was, sometimes it will return to the newest post in your feed. Then, you just have to try to remember how many hours ago you were at, and scroll back to that location. Unfortunately, there’s no feed location bookmarking, which would be really useful, because…
…feed synchronisation simply doesn’t work. Put it this way:
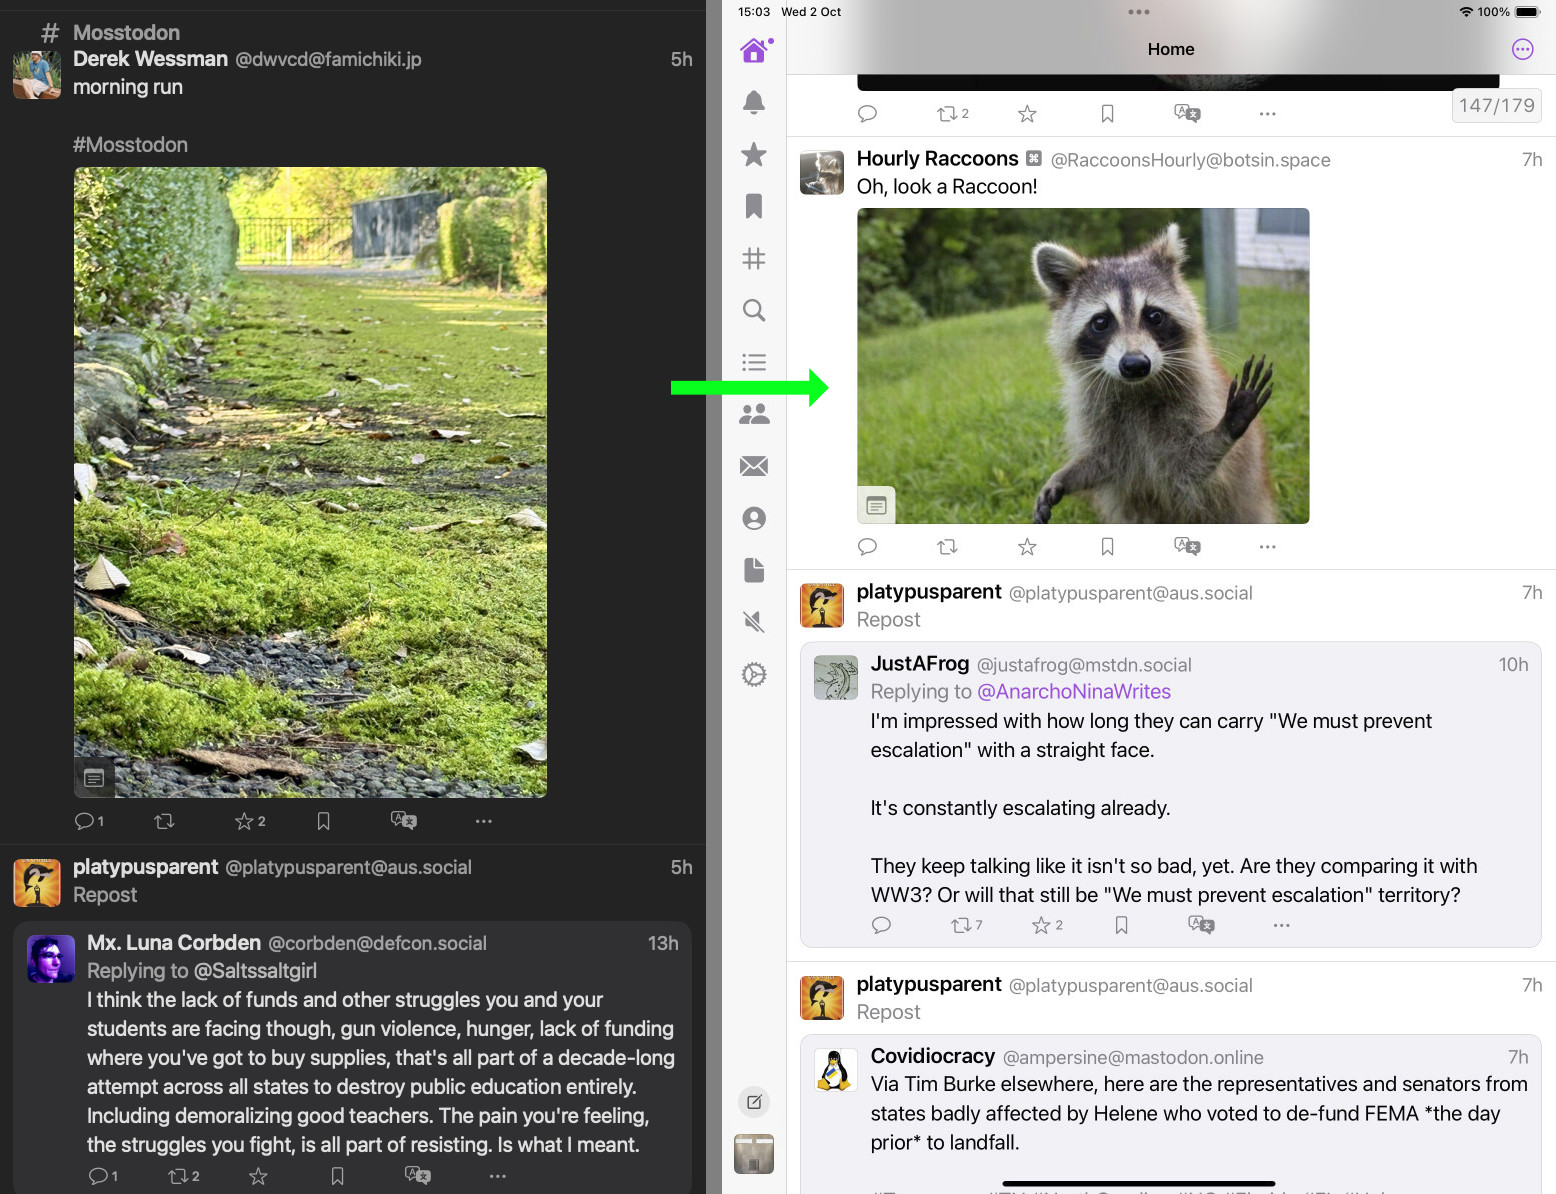
5 hours, syncs to 7 hours.
What these images are showing is that I was reading my Mastodon feed in Mona for Mac, and I had reached a point where I was 5 hours in the past, in terms of the posts I was reading. I moved over to my iPad, unlocked its screen, opened Mona for iPad, and after it did it’s “restoring iCloud Position” dance, it synced to a point that was 7 hours in the past.
Later in the evening, I tried again, this time going from my Mac to my iPhone:
1 hour, syncs to 6 hours.
This time I went from 1 hour in the past, to 6 hours in the past upon unlocking my iPhone, opening Mona, and waiting for it to “restore iCloud position”.
Or another attempt:
4 minutes, syncs to 4 hours.
…you get the idea.
To be clear, what is happening here is that Mona is saying it’s syncing my reading position on my iOS devices, to match where my Mac is at, and getting it wildly wrong.
What’s really problematic about this is that there’s no way to get the correct timeline position from my Mac, with the iOS device. If I look in the settings on the iOS devices, I will see that the last upload of Mona sync data to iCloud from my Mac was after I stopped advancing the timeline, and yet, for no good reason I can figure, Mona is picking some random (and inconsistent) time as it’s sync timecode.
Where this becomes a data-loss class issue, is that any interaction with Mona on the iOS device at this point overwrites my Mac’s timeline location. If I do any scrolling on the iOS device, it will push that timeline to iCloud, and my Mac will then jump to that location, if it is still awake with Mona on the screen.
I lose the correct data, by interacting with the incorrect data in any way.
If I swipe quit Mona on the iOS devices, and relaunch it at this point, it will load with its timeline set to the current moment, and then overwrite my Mac’s timeline location.
The only way to get consistent timeline sync is to have both devices open in Mona next to each other, and then advance the timeline on the source device, until the destination device reflects those changes. At this point the timelines will do the party trick of moving their timelines in unison.
Obviously, this isn’t a tenable situation – the whole point of iCloud Sync is that you can do something on one device, switch to another device any amount of time later, even if the original device is asleep or shut down, and just pick up where you left off. As far as I can recall, Mona is the only application I use which makes use of iCloud Sync, and consistently fails to correctly sync.
Whatever the reason, the point is that the Sync function doesn’t work in the real world. As a gimmick, making the timeline on one device move in realtime sync with another device is fine, but that doesn’t solve the problem of maintaining continuity of reading location as you switch between devices.
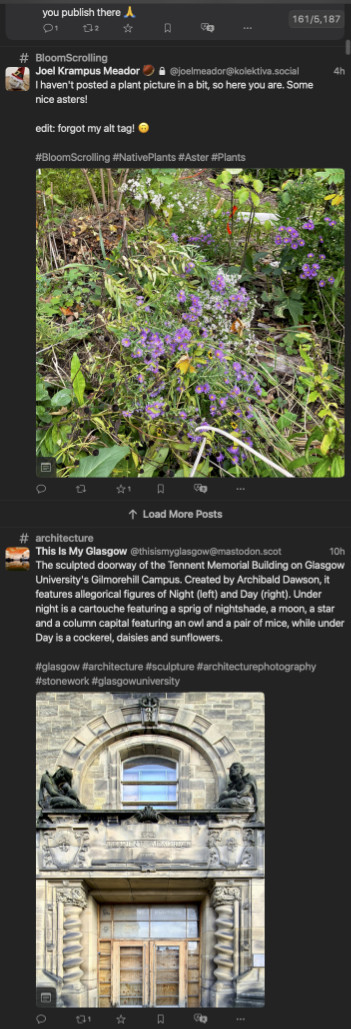
The other thing that bugs me about Mona, is the timeline compression that occurs after not using the application overnight. You sit down to Mona in the morning, to catch up on what’s happened in your feed overnight, and some inconsistent way on from your current location, is a Load More Posts label; after which, your feed continues from only 4 hours ago.
What inevitably happens as I sit there scrolling un-caffeinated, is I find myself suddenly wondering why I’m already at only 2 hours, and realise somewhere in my scrollback is a clickable link to load between 6 and 8 hours worth of posts. So I have to manually scroll back, until I find an image I recognise from last night, and then carefully find the single line Load More Posts link.
This wasn’t the behaviour of the app when I purchased it. For whatever reason, no matter how many times I’ve made this suggestion, the developer won’t do anything to either make this a behaviour that can be disabled, or make the Load More Posts label more obvious; like giving it a bright contrasting background colour, or a skeuomorphic broken, saw-toothed edge, which contrasts against the dominant horizontals and verticals.
It’s maddening, and a great example of how self-sabotaging people can be with their own work.
So that’s Mona (as of 24, October, 2024), an app that showed great promise in its early days for its massive, industry-leading customisability, which really pointed to a better direction for software which every part of the UI being user-modifiable, but which is now drowning under its basic technology not being up to the task, and its core feature – the literal reason you would use it, and not a browser; feed syncing, no longer actually working with any reliability.
It really does seem that no one is capable of making truly great software any more. Whether it’s building on janky non-native libraries, or image editor apps that are restricted to a single window with no tear-off palettes, or photo library apps that can’t have the thumbnails in one window, and the viewer in another, or full-screen preview software that can’t cope with having more than one display, everything seems to be collapsing to a world premised on no one using anything other than a single-screen laptop.
What has gone wrong with the culture of software development?
I’ve been listening to podcasts for over 20 years. The entire time, my collection has been subscribed, and managed within Apple’s iTunes.
No longer.
Podcasting is a medium under threat from a number of assailants:
Advertising agencies and “Podcast Networks” using Dynamic Ad Insertion: Advertising has shifted to “zero effort” pre-recorded ads, that are geotagged and invasively targeted to the listener. It’s a worse version of commercial radio advertising.
I was listening to a recent episode of a show on the “i heart radio” network (fetch my vomit bucket), and it had (if I recall) eight 30 second pre-recorded ads in a single break.
Prior to this development, podcast advertising was almost exclusively sponsor reads by the hosts of the show – you could enjoy listening to them, because the hosts would bring their own charm to the commercial.
Now you’re listening to a (typically) American or British show, and you suddenly get a broad Australian (in my case) accent pitching you McDonalds, or coal-fired power. So now, I skip ads reflexively.
Independent Podcast Applications trying to do both too much, and too little: Every podcatcher & podcast player I’ve found so far, that run on Mac and iOS, are loaded up with recommendation garbage and show discovery, but won’t actually provide a competent interface or methodology for managing a locally-stored podcast collection*.
They all seem to presume that either no one collects podcasts, treating them as ephemerally as radio, or that everyone burns down their entire back-catalogue collection every time they change application, and just re-downloads everything from scratch. Every app features OPML export to migrate the feeds between apps, but no one provides a mechanism to migrate the downloaded episode library.
If you have files that aren’t attached to a feed, they’re effectively inaccessible, because none of the apps (from my experience) will let you just point to a directory full of files, and treat that as a show.
There’s also the sheer idiocy of using cloud services to sync the actual episode files themselves, tens or hundreds of megabytes in size, rather than just direct transferring them between devices. I think there has to be something profoundly wrong with you, if you think the way to move data a foot across a desk, is to round-trip it via a server on the other side of the world.
Apple: As the big dog in podcasting (though I note with significant schadenfreude that Spotify has apparently dethroned them), Apple is attempting to pivot from simply providing good applications, and a directory of shows, to selling subscription-based premium podcast feeds (and providing a mediocre podcast application).
To that end, Apple has stymied access to the location where Podcasts.app on the Mac downloads its files; using randomised strings for names of files and directories, therefore removing human readability. Worse still, it’s enforced location is on the boot drive – something that can’t be upgraded on almost all Macs, and for which Apple typically charges approximately four times the industry norm, per gigabyte**.
This comes after years of streaming-oriented changes to podcasts in iTunes, which made the process of keeping your files safe from auto-deletion more and more uncertain. It eventually required manually saving every single file, OR accepting a risk that if a feed moved and reposted its back catalogue to a new server, or changed the naming scheme for back catalogue files, iTunes would download the entire back catalogue again.
*Which excludes Overcast, because its entire basis is you rent space on Overcast’s servers, and store your collection there. However, I don’t build my archive plans on how long a single developer remains interested in continuing an app or business, nor on the volatility of server rental.
**I’ll note with some bitter irony that Mac OS X used to have human-readable plain text XML for all preference files, but they’ve been largely replaced with binary encoded versions that require a dedicated application to decode, and this regressive change was justified as saving disk space. Sure Apple, we’ll save a few megabytes so you can cheap out on the SSDs you put in machines, which you’ll fill to the brim with podcast files we used to keep on external drives.
So to hell with Apple.
Where to from here? Well, I’ve started by:
Manually copying all my podcast back catalogue episodes out of my old iTunes Music directory, into a new Podcast Archive: Everything there is organised in human-readable simple directory structures, with a folder for each show, and every episode in the appropriate place.
To deal with shows which have changed server, or changed their “album artist” or “artist” ID3 tags (which is what determines the name of the show / feed within the Podcasts.app), I’ve used a tag editor (MP3tag) to align all the previous episodes to the show nomenclature of the newest episodes.
For mass file renaming, to match the name schema of new downloads (because iTunes used to do strange things to filenames when saving podcast downloads), I’ve used Name Mangler.
For cases where the date created and modified of files are out of order, I’ve used A Better Finder Attributes to adjust things so that Finder’s view of the episodes can, by sorting as a list, reflect their original feed order.
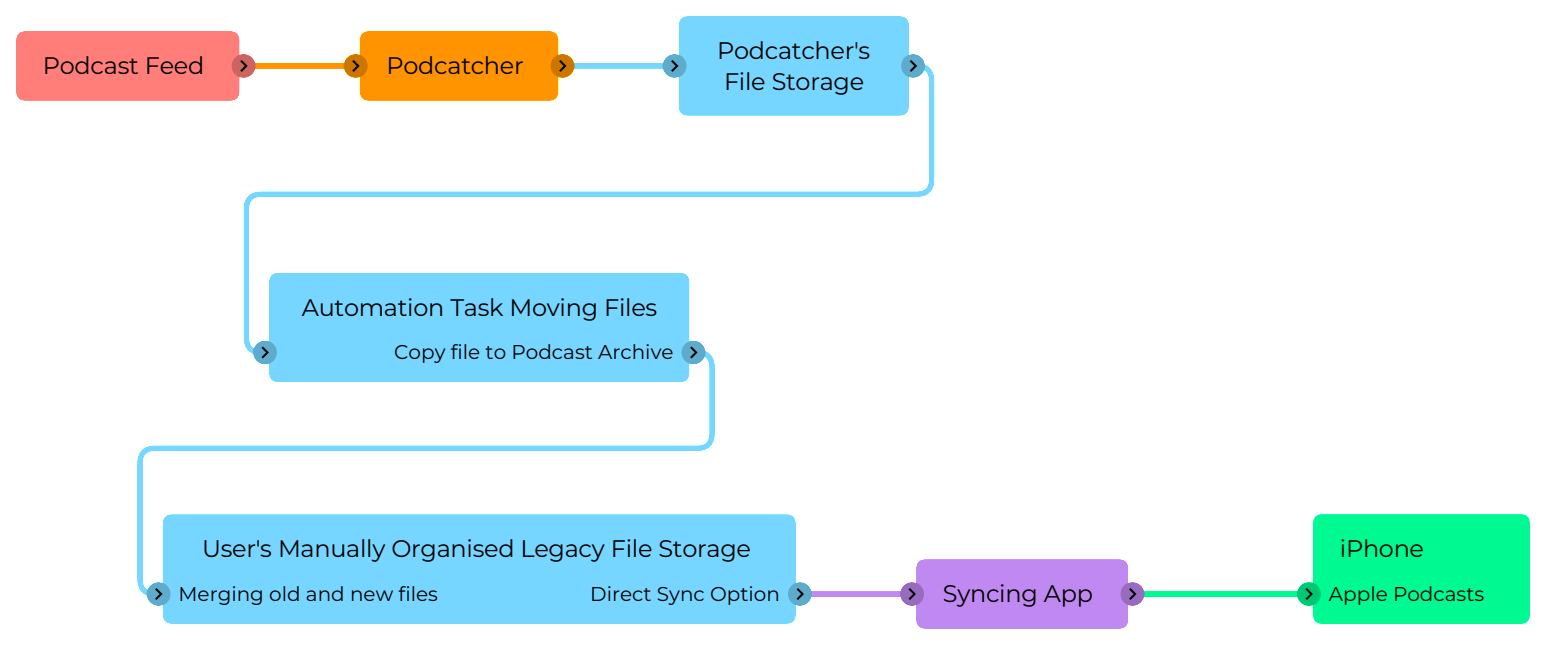
Setting up a new podcatcher application:Doughnut – an open source podcatcher and player. It’s still relatively early in development, and seems to have become somewhat dormant, but it’s a workable, basic application that has no frivolous show discovery or non-core functionality. I’ve set up all my subscriptions in Doughnut that were previously active in iTunes. Doughnut downloads new episodes automatically to disk, but that doesn’t solve keeping them in my new Podcast Archive, since it can’t display existing files on disk – it only knows about things it has downloaded.
Transferring downloads to the Podcast Archive: Once Doughnut downloads a file, Hazel (a system automation tool) copies the file to the corresponding directory in the Podcast Archive.
The setup for this is pretty simple. In Hazel, I configure every folder Doughnut created for each subscribed show as an automated folder. I add an automation to each that has the rules; “File was created in the last 5 minutes”, and “move to (the Podcast Archive folder for that show)”. You could achieve this with the system’s built-in Folder Actions, or Shortcuts, etc.
The nifty thing about this is that since both the Doughnut directory structure, and the Podcast Archive are on the same logical APFS volume, the copy doesn’t use any more space – the two files are just references to the same thing, but behave as if they’re independent objects. Another advantage of this is if Doughnut has an issue, like randomly deleting files, it’s only acting on its downloaded copies, not your actual Podcast Archive. This of it as air-gapping your collection from the podcatcher.
Viewing the Podcast Archive: While I can just browse my files in Finder, in any of the traditional views, what if I wanted a more holistic overview of all my shows in the archive, in a single list, ordered by date? Remember SpotlightFinder searching, and Smart Folders / Saved Searches? A bunch of wonderful technologies that have sat, undercooked without full GUI support sine Apple bought Siri and realigned the company around the idiotic notion that a server on the other side of the world was the best way to search for things on your computer. What we do, is:
navigate to the root directory of the Podcast Archive
in the search field at the top of the Finder window, type a single space character. This non-discoverable and unintuitive action will bring up the GUI options for crafting your search criteria.
hit the plus sign
set up Kind, as Document, and then hit plus again
set Date Modified as however far back you want the list to show, if you want to limit the list; the last month, for example.
Save your search (I keep saved searches specific to a volume on the root level of that volume) and choose to add it to the Finder sidebar, because that makes it available for use in open / save dialogue boxes (normally, Smart Folders can’t be accessed through an open / save file browser).
Syncing to iPhone: Here we come to iMazing, which has the ability to copy files from Finder, directly into the Podcasts.app on your iOS device, without having to go the whole Finder sync procedure.
A word of caution; one of the goals of this process was to completely cut Apple out of my podcast life. When you install / first launch Apple’s Podcasts.app on iOS, it defaults to iCloud enabled, and downloads all your podcast subscription records from your iCloud account in the background before you interact with it. It is VERY hard to get rid of this once it’s in the app, so an important step within iTunes (or the Podcasts.app on Mac) is to:
Manually unsubscribe from every show to which you’re subscribed (and give that a few minutes to propagate to iCloud).
Switch off iCloud podcast sync on your Mac.
THEN delete Podcasts.app from your iPhone, nuking all its data with it.
Reinstall Podcasts.app on your iPhone, it should then load with an empty library because iCloud has no data for it.
Disable iCloud Sync in the settings app for Podcasts.
Now you’re ready to copy files with iMazing. One thing – you may encounter a bug where Podcast artwork isn’t copied across. As of mid-September, iMazing is aware of it, and are working on a fix.
And there you have it – you are now effectively back to the way things were when Podcasts were subscribed to in iTunes, and synced to an iPod. You lose a couple of things, like play counts, and synced playhead positions. However, iMazing’s drag & drop podcast loading (for which you can use your super-handy Smart Folders as your source) is a better workflow than the original iTunes sync. You also gain the ability to edit your podcast files (so those 10 year old adds for Lootcrate…) without worrying about breaking feed continuity.